Sunday, December 20, 2020

Excel Smart Art Tutorial 


Smart Art is not only offered in Excel, but other Microsoft Office programs, so you can use this tutorial for Word Smart Art and PowerPoint Smart Art as well.

To Insert Smart Art, follow these steps:

1. Select the Insert tab from the Ribbon.

2. Select SmartArt.


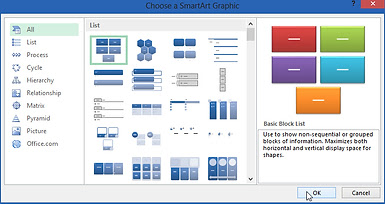
3. In the Choose a SmartArt Graphic dialog box, select the category on the left. Then you select the item in the middle. The right shows a preview of the item. Select OK to insert the content.

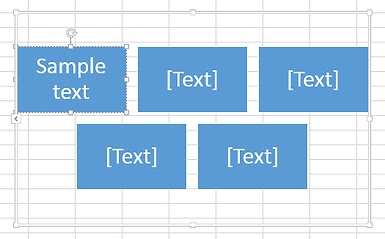
Excel inserts the selected SmartArt graphic in the middle of the spreadsheet.


Picture handles appear around the graphic when you select a SmartArt graphic. These handles help when resizing the graphic manually. Make sure these handles are present when you need to move a graphic. If you make changes that you don’t want, you can reset the object to the original graphic.

Now, simply click on one of the boxes and type in your text, if desired. Notice that the font sizes adjust, depending on how much text you enter.

1. To the left of the SmartArt graphic you inserted, there is a small rectangle with an arrow. Click this arrow to open the Text Pane.


Excel opens the Text Pane.

2. Click on the first line and begin typing. Each line represents a new item in the graphic.


The SmartArt text adjusts to fit the graphic. The more text you enter in each graphic element, the smaller the text will become.

3. When you have finished, click anywhere on the spreadsheet, and the Text Pane will close automatically. Or you can click the X in the top right corner.


To resize a SmartArt graphic, do the following.

1. Click on the SmartArt graphic to select it. Notice the border around the graphic.


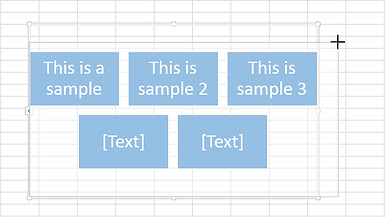
2. Select one of the corners and drag the picture. Notice the cursor changes to a diagonal line with arrows at both ends. You can make it smaller or bigger, depending on which direction you drag.

3. Release the mouse when the graphic is the desired size. Notice that Excel may rearrange the graphic elements for the best look and fit.

To move the Smart Art, do the following.

1. Select the diagram border.

The cursor changes to a cross with four arrows.


2. Drag the mouse to move the diagram. Release the mouse when the diagram is in the desired location.

Note: You can move the individual parts of the SmartArt diagram using the same procedure. Just click on the individual object you want to move. Practice this and you can create some really unique diagrams.

Reset the Smart Art:

Resetting the diagram allows you to quickly return the graphic to the original alignment and spacing between elements. Use the following procedure to reset a diagram.

1. Right-click on the diagram.

2. Select Reset Graphic from the context menu.


It really is simple to use Smart Art in Excel, or any other Office program. However, if you truly learn the ins and outs of it, you can make some spectacular and unique images.

Keep it simple, but make it fantastic!

- Debbie

Wednesday, November 25, 2020

Does Time Management Really Work?


I hate how useless time management guides are to me."

I saw a post with this quote and thought, "hmmm, what guides is this person reading?"

Or, is this person reading and not implementing the tactics taught in the guides?

For me, this resonates a bit because not only do I, probably like many of you, find myself crazy busy often (especially with everyone working and schooling from home these days), but get caught up in the moment and forget everything I've learned about Time Management.

It can be a chore when first learning techniques and strategies to save time in your day.

They say, "It takes 21 days to create a habit."


But they also say it can take the same amount of time to break a habit, but I say it can take just a few days to stop using the time management skills you put into place by reading one of these "useless time management guides..." or "courses..."

Time Management goes hand in hand with Motivation. If you are not motivated to get more time out of your day, then you will neglect the habits you learned and started using.

So, how do you ensure you continue to use time management techniques you've learned?

You have to see results quickly! Even if you slip, going back to remember the time management skills you learned and started using, you can get back into them and probably create that good habit in less than 21 days this time around.

I personally think that most people's motivation has to be that they will have more free time.

Everyone I know, every week, says, "Thank God it's Friday!"

- do you hear that too?

I'm thinking about starting a 21 day challenge around getting more free time by learning Time Management techniques using Outlook. Although the techniques I used can be used with other Email software like Gmail, but my focus is the software I use.

Are you up for the challenge?

Is there something else you'd like to learn, like how to get and stay motivated?

I'd love to hear your thoughts! Feel free to email me with whatever it is that you need to get more of your free time back in your life.

Feel free to drop me an email and let me know!

contact@goaskdebbie.com

If you're interested in learning more on Outlook, CLICK HERE to download my FREE Outlook Time Management Mini-course.

Excel Slicers - How to Use them and Why 


Did you know that Excel Pivot Tables can do so much more than just show your data and sum or count it?

Are you saying, "Debbie, what are slicers?"

Let me explain...

Slicers were added in Excel 2010 to filter PivotTable data. In Excel 2013 & newer versions, you can now use slicers to filter any table data. Slicers clearly indicate what data is shown in the table after you filter the data. They include buttons so that you can quickly filter data without having to use drop down lists to find the items you want to filter. Timelines are a type of slicer that is specific to date ranges.

A slicer typically displays the following elements:

  1. The Slicer Header – indicates the category of the items in the slicer.

  2. Unselected filtering button – indicates that the item is not included in the filter.

  3. Selected filtering button – indicates that the item is included in the filter.

  4. Clear Filter button – removes the filter by selecting all items in the slicer.

  5. A Scroll Bar – enables scrolling when there are more items than are currently visible in the slicer.

  6. Border moving and resizing controls – allow you to change the size and location of the slicer.


Now that we've described what they are and their elements, let's talk about how to use slicers.

Using slicers

To filter your data, just select one or more of the buttons in the slicer.

You will likely that you will create more than once slicer to filter a data table or PivotTable report.

You can create a slicer that is associated with the current data table or PivotTable. You can also create a copy of a slicer.

Once you create a slicer, it appears on the worksheet alongside the table data, in a layered display if you have more than one. You can move or resize it as needed. Once created, a slicer can also be used with another table or PivotTable.

You can create slicers that work with the current data table or PivotTable or you can create a stand-alone slicer that can be associated with any other table at a later time.

If you already have an existing table, you can add slicers to improve your current table and its usage.

The Insert Slicer command is available from the Insert tab on the Ribbon. The Insert Slicers dialog box helps you quickly create your slicers, based on the data in the table you selected.

To Insert Slicers, follow these steps:

  1. Place your cursor anywhere in the table.

  2. Select the Insert tab from the Ribbon.

  3. Select Slicer.


4. In the Insert Slicers dialog box, select the check box(es) of the fields from the table for which you want to create a slicer.

5. Select OK.


6. To apply your filters, just select the buttons for the items you want to include. You can hold down the CTRL key while selecting to choose more than one button.


Now that your slicer box appears, users can simply click on an item to filter the Pivot Table by that item. If a user continues filtering by data and needs to reset, simply click on the Filter button in the upper right corner with the Red X to clear (or remove) filters (#4 in the image above).

If you do not like the location of the slicer box, simply click and drag it around the page to placed it in the best area for users. This is particularly helpful if you setup more than one slicer. You can organize them how it best makes sense for the person using the table to look at data.

It really is that simple.

Monday, November 2, 2020

Excel Tutorials: Trace Dependents


I've had many people asking lately to create more Excel courses and particularly about formulas and data.

So, I've just uploaded a short tutorial on Trace Dependents.

CLICK HERE to watch the video.

OR, read on to view the text version.

If you have formulas that are based on the contents of another cell, you have dependent cells. The Trace Dependents command is useful to see how other cells are influenced by the active cell’s contents. 


The Trace Dependents command allows you to show tracer arrows to show the relationship between the active cell and the dependents of that cell.

1. Select the cell that you want to trace.

2. Select the Formulas tab from the Ribbon.

3. Select Trace Dependents.


4. Excel adds a tracer arrow to each cell that uses the active cell’s data.

5. Click the Trace Dependents tool again to see further relationships that are influenced by the active cell’s contents.


To learn more, CLICK HERE to view my video on Trace Precedents (the sister of Trace Dependents).


Sunday, October 25, 2020

5 Steps To Break Or Make A Habit 


We all have habits. Some of yours may be good and some not so good. I know I have both. I try to eat healthy and only eat whole foods, but I love Coca Cola - no diet stuff - the real thing.

Habits are behaviors that occur almost automatically because we’ve learned them and/or been doing them for some time.

Most of us have a habit we’d like to break, or one we’d like to create.

They say it takes 21 days to develop, or break, a habit.

Here are 5 Steps you can follow to begin developing good habits you may have been trying to create for your life.

1. Set Your Goals

Habits should align with your goals. This will help you determine if you need to break a bad habit, for example. You should also write down your goals. Writing it down helps you to commit.

Some people even have their goals written, printed, and displayed so that they see them every day. It's a visual reminder that helps you stay focused.

2. Decide on a Behavior

If you are trying to stop doing something, then decide on the bad behavior and how you will replace it with something good. If it is to start a new habit, decide on a daily behavior that you need to start doing in order to create the new habit.

3. Learn Your Triggers

Behavior patterns don’t exist independently. Often, a habit is associated with another part of your regular routine. For instance, if you snack when you're not hungry, the trigger may be late night television or reading. You automatically grab a bag of chips while you watch.

For me, it's popcorn when watching movies. I grew up eating an entire tub of popcorn and a bag of licorice whenever I saw a movie in the theatres. To this day, I often grab for a bag of popcorn. To help get myself to stop eating an entire tub of popcorn, I put an appropriate amount on a plate or in a bowl and allow myself only that amount. Many people who smoke automatically light up after eating. Try to start recognizing your triggers and you will more easily be able to change these patterns.

4. Write Daily Affirmations

Write down, and even say out loud, affirmations that speak to your goals or habits you are trying to create. Make the affirmation in the present tense (as if it were already happening), and write it ten times a day for twenty-one days. This will help make your goal become part of your subconscious, which will not only remind you to practice the new behavior, but it also keeps you focused and motivated.

5. Reward Yourself!

It's important to reward yourself for making small steps towards reaching your new habits. If you complete the behavior you setup and wrote down your daily affirmations for say 3-4 days in a row, rewards yourself! Give yourself a treat, but make sure that if your goal of a new habit is something around eating healthy, that the treat cannot be food related. The treat should never be something that will go against your efforts of creating the new habit.

When the Keto dieting phases started some years ago, I had co-workers that all said we would have 1 cheat day each week to reward ourselves. For me, that only got me to crave the bad foods I would have on my cheat day. Rewards don’t have to be big or expensive. Try to make it something that’s associated in some way, in a positive way, with the goal. Doing this will provide you with both incentive and extra motivation.

Follow these steps for 21 days and you'll be surprised how it can change your life. If you stick with it, you can do it. Good Luck!

What systems do you use to track your behaviors? Do you place them on your Calendar in Outlook? Do you write them in a journal?

Or are you looking for a system to help you with your habits and goals?

I'd love to hear how everyone tracks their goals and behaviors to ensure good habits are developed and kept in your life!


Saturday, September 19, 2020

Outlook Notes vs. OneNote


Which do you prefer: Outlook Notes or OneNote?

I actually use both of these, but to me, it really depends on how you keep yourself organized on whether Outlook Notes or OneNote is better for you.

Outlook allows you to turn Meetings into Note-taking in OneNote very easily. Simply click "Meeting Notes" on the menu and select "Take Notes on your own." Outlook will then create a page in your OneNote folder including the date, time, and recipients of the meeting. You can then take notes during the meeting and send to all recipients very quickly.

Outlook Notes, however, are just like sticky notes.

Now, many time management and organizational experts will tell you that sticky notes are not a good way to keep yourself organized. I agree and disagree, depending on how you use them.

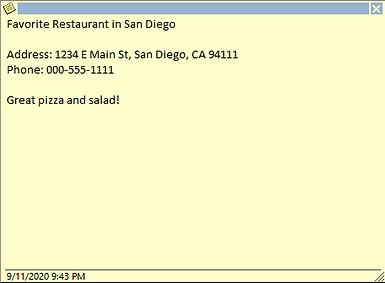
For simple things I need quick reference to, I will often setup an Outlook Note - or "sticky note." I call them that because when you being using them, you'll see that they appear to look just like sticky notes - or name brand "Post-it Notes."


Above is an example of how I would use Outlook Notes. I use them for things like my favorite restaurant information or for the details of places I'd like to see on a vacation.

Now, I can also do these things with my phone Notes, but sometimes, I don't want to cloud up my phone and would rather keep them safely protected for current and future use in my Outlook Notes. Also, I know many people who still have older phones and don't have the option for Notes on their phone.

And, just like when you buy sticky notes, you can use varying colors.

Simply right-click on an existing note and select the Category that is already setup with color-coding. Or you can click "Categorize" on the ribbon and do the same thing.


You will then be able to see your Outlook Notes come alive with the different colors. This helps me as I setup some as "Work," some as "Personal" or "Family," and others as I need.

I'd love to hear how you keep track of notes. Do you prefer Outlook Notes or OneNote? Or do you use something entirely different?

If you're interested in learning how to use Outlook for Time & Task Management, download my FREE 65 Ways to Use MS Office to be More Productive! eBook.