Monday, September 23, 2024

Excel Formulas, Functions, & PEMDAS


Welcome to this session Excel formulas and functions in this module we will learn how to perform basic calculations using formulas and functions.

The backbone of excel is its ability to perform calculations. Formulas are mathematical expressions that you build yourself you need to follow proper math principles in order to obtain the expected answer.

You may either watch the video here or follow the steps by reading the text in this blog located below.


To begin creating formulas and functions in Excel, you must understand basic math principles.

Basic arithmetic operators include the Plus Sign (+) which adds value, the Minus Sign (-) which subtracts value the Asterisk (*) which multiplies values the Forward Slash (/) which divides values the Percent Sign (%) which finds the percentage of a value and the carrot which finds the exponential value.

Basic comparison operators include the Equal Sign (=) which equates value, the Greater Than Sign (>) which indicates that one value is greater than the other, and the Less Than Sign (<) which indicates that one value is less than the other.

Let's review some of these.

Excel is like a calculator with simple formulas. Excel can perform calculations on numbers using operators we just talked about and functions such as Sum to add numbers.

The formula always starts with the Equal Sign(=) ,then type a number, then the plus sign, then another number and press Enter and the cell will display the results.

You can add many numbers this way, not just two. Instead of typing numbers in a formula, you can reference cells that contain the numbers to make adding easier and faster. It also gives you more more flexibility.

Let's create a formula that Adds the cells.

Type equals, click a cell, type the plus sign, then click another cell and press Enter.

If I change a number in one of the cells referenced, the results of the formula will automatically update.

When you double click a cell, you can see if the cell is a Formula. Double clicking or pressing F2 lets you see the contents of the cell. This places you in Edit mode for the cell. You can also see the contents in the formula bar here.

Subtracting is just like adding, but instead you use the minus sign, click a cell, then enter the minus sign, then another cell, and press Enter.

Multiplying and Dividing are similar.

To Multiply, use the Asterisk (*), press the equal sign, click a cell, then the asterisk, then another cell, then press enter.

To Divide use the Forward Slash (/), click a cell, press the forward slash, another cell, and then press enter.

AutoSum makes it easy to add adjacent cells in rows and columns.

You could type =A3 + A4+A5, etc, but that could be tedious with a large amount of data.

Instead, click the cell to the right of a row, or just below the column of where your data is housed, then on the Home tab click the AutoSum (Σ).

Confirm the formula is what you want to calculate and simply press Enter.

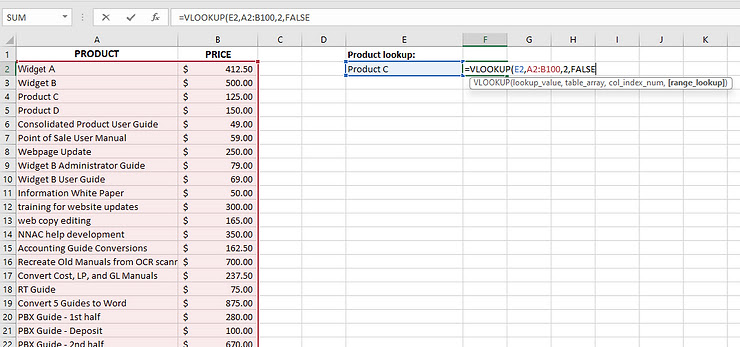
When I double-click the cell with the AutoSum you'll see it's a function. The syntax of the Sum function is =SUM(number1, number2, number3)

This formula is =SUM(A3:A6) which indicates a range of cells. It adds the cells from A3 through A6. If you try to do AutoSum here where there's missing data, it will only capture the adjacent cells with data, since row five is empty.

Excel doesn't recognize the entire column or group of adjacent cells to add cells and ranges of cells that aren't adjacent.

Type =SUM( and then hold the CTRL key and click the desired cells and ranges of cells, close parentheses and press Enter.

As a side note, the keyboard shortcut for AutoSum is ALT +.

Excel recognizes negative signs and it subtracts these numbers, even when using the Plus Sign for addition.


Excel uses the standard math order of operations you've probably heard PEMDAS, which stands for "Parentheses, Exponents, Multiplication, Division and last our Addition and Subtraction," all from left to right.


Excel understands and follows the order of operations, so when you write formulas, be sure to remember this rule as well.


Tuesday, September 17, 2024

Excel =VLOOKUP to quickly find data


Learn the power of Lookup Functions in Excel


Excel spreadsheets can become large and overwhelming at times. To manage large spreadsheets and find data easily, use the =VLOOKUP function as described in this tutorial.

Many people I've worked with over the years work have large spreadsheets containing hundreds and thousands of rows and columns worth of data. Often users manually search these hundreds or thousands of rows and columns to find specific data over and over again. This can be so time-consuming and has the potential for lots of errors.


But, when you need to find information in a large spreadsheet, there is an easier way. The =VLOOKUP function works quickly and easily.

=VLOOKUP works a lot like a phone book, where you start with the piece of data you know, like someone's name, in order to find out what you don't know, like their phone number.


Watch Video here or Continue to Read On...


To use the =VLOOKUP function, follow these steps.


For this example, use the Excel table in the image above. We've setup a table with the first column containing names of employees. The next few columns contain test scores pertaining to licensing information needed for the Human Resources department.


The Human Resources Director holds this data in an Excel spreadsheet and is asked to provide Dan's score on Test3.


The formula may be setup in a separate cell and edited to find specific information when needed. In our example, it would be very easy for the HR Director to simply find Dan's name in the "EMPLOYEE" column and look at the score for "Test 3." However, the =VLOOKUP function is really helpful when the spreadsheet contains hundreds or more rows and columns of data. So, pretend the data is so large that it's not obvious what Dan's score is on Test 3.


In Cell H2 we'll place the following formula:


=VLOOKUP("Dan",A2:F18,4,true)


Here is an explanation of each of the fields within the parentheses of the formula.


  • "Dan" is the Lookup_Value. This is the data you are telling Excel to search.

  • A2:F18 is the Table_Array. This is the range containing the data you want to search.

  • 4 is the "Col_index_num" field. This is the number of the column that contains the data you need. In our example, "Test 3" scores are located in Column D, which is the 4th column in the spreadsheet.

  • True is the "Range_lookup" field. This field defines how close a match should exist between the "Lookup_value" (Dan) and the value in the column on the lookup table. If Dan's name is listed as "Daniel," you may want to leave this field blank. When placing "false" in the "Range_lookup" field, Excel looks for an exact match to the "Lookup_value."


NOTE:  If Range_lookup is either "true" or is omitted, the values in the first column of Table_array must be placed in ascending sort order; otherwise, =VLOOKUP might not return the correct value.


So what just happened? I told Excel, “Here is a value in the left-hand column of my data - this is the name of the person I want to look up. Now look through this range of cells, and in the fourth column to the right (Test 3 data), find the value on the same row.”

The bottom line is that Excel spreadsheets containing large amounts of data do not need to be overwhelming and do not need to take a long time to find specific data. Use the =VLOOKUP function and your large Excel spreadsheets will become easy to manage.


Here's another example.

What if I wanted to keep the =VLOOKUP formula, but continue to use it to find results for different people based on what name I enter?

To do that, I'll simply need to replace the Lookup-Value reference. Instead of specifically entering "Dan" to find Dan, enter the field where you can enter a different name each time you'd like to search.

So, now the formula becomes =VLOOKUP(H1,A2:F18,4,True).


Now if we enter "Billy" into cell H1, the result provides us Billy's score of 88.

If we then change H1 by entering "Dan," we now see Dan's Test 3 score of 78 again.


Now, practice on your own. What if you wanted to change the Test # you want to search for?

The examples here are so powerful, but as you can now imagine, =VLOOKUP can be so powerful and helpful. I urge you to try this for a basic search of data you have in a spreadsheet and as you get more and more comfortable with =VLOOKUP, try to push it like we started in the second example here.

Good Luck and Happy Excelling!


Monday, September 16, 2024

Excel: Create a Pivot Chart from Pivot Table


In this tutorial, I show you how to easily create a Pivot Chart from an existing Pivot Table.

Continue below to read or watch the video here.


Creating a Pivot Chart from a Pivot Table

Click anywhere in the PivotTable for which you want to add a chart.

1.       Select the Options tab from the Ribbon.

2.       Select PivotChart.


Excel displays the Insert Chart dialog box.


3.       Select the desired type of chart and select OK.


Creating a Pivot Chart from Data

Use the following procedure to insert a PivotChart.

1.       Place your cursor somewhere in the data you want to analyze.

2.       Select the Insert tab from the Ribbon.

3.       Select the arrow under PivotTable. Select PivotChart.


Excel displays the Create PivotTable with PivotChart dialog box.


4.       Excel automatically provides a range of cells based on your selection. You can change the table or range if desired.

5.       Select a location for the PivotChart. You can have Excel create a new worksheet or select one of the existing sheets.

6.       Select OK.

Excel displays the PivotChart and the Field List for you to begin choosing your fields and grouping data.

7.       Add fields to view the chart.