Do you need a Full Name field to import into a particular program? But, you only have First Name and Last Name fields in Excel? There are many times when you need to Merge or Join Cells in Excel - this tip shows you how easy it really is:
Insert a New Column.
Type =CONCATENATE(Cell1,Cell2,etc)
Using the formula above, here is an example of the results:
Cell1 Cell2 Cell3 RESULTS
Go Ask Debbie GoAskDebbie
If these are the results you wish, simply Copy the formula down the column to include all rows you wish.
But, let's say you need a Space or a Comma between each of the cells once they have been merged. To do this, type your formula as follows:
=CONCATENATE(Cell1," ",Cell2," ",etc)
This would create the following result from the above scenario "Go Ask Debbie". Notice now there are spaces between the cell contents.
Get creative this can help you create many different types of results.
Friday, October 23, 2009
More Word Shortcut Keys
If you enjoy shortcuts (who wouldn't?), here are some more Shortcut Keys that will help you become faster in Word.
Ctrl + K = Insert hyperlink
Ctrl + Z = Undo
Ctrl + Y = Redo
Ctrl + L = Aligns the line or selected text to the left
Ctrl + E = Aligns the line or selected text to the center
Ctrl + R = Aligns the line or selected text to the right
Ctrl + M = Indent the paragraph
Practice these handy tips and you may forget about your mouse :)
Friday, October 16, 2009
Use PowerPoint to Create a Photo Presentation
Everyone has probably received an e-mail (or a thousand) of a PowerPoint Slideshow Presentation showing off Beautiful Pictures, right?!
Well, you can do this very easily by following these steps:
With PowerPoint open, click on Insert Picture Photo Album (in PowerPoint 2007, choose "Photo Album" from the Insert Tab).
In the dialog box that opens, you will choose your photos by clicking on the "File/Disk" button.
Browse to locate your pictures (it will help to have these organized into a folder prior to opening PowerPoint).
Insert the photos and choose the Layout, Frame, and Template styles.
Once you are ready, click on "Create".
You have now created the Slideshow!
However, not all people will have PowerPoint, so if you plan on sending the Photo Presentation via e-mail, you may want to "Save As" a ".pps" file type. This format will open using any Internet Browser.
Create Your Own Shortcuts
If you're not an expert, it can take many clicks and a lot of menu navigations to perform basic tasks. With shortcut keys, you can speed up your working pace without lifting your hands from the keyboard.
In Word, you can create your own keyboard shortcuts! For example, if you are using the "Word Count" feature often, you can assign any key combination like Alt+W to run the Word Count command.
Follow these simple steps to create your own shortcuts keys for your favorite command:
Go to the Tools menu and click on Customize. (Hint: In Word 2007, the Customize Option is located on the "Office" button)
In the dialog box that opens, click on the "Keyboard..." button.
A list of all the categories of commands will appear on the left side of a new dialog box.
Click on the Category that contains the command which you want to assign a shortcut key.
From the right side, choose the Command you want to assign a keyboard shortcut and then Type or
Click the key combination you want to use to create the shortcut.
Now click on the Assign button and then click Close.
Now, when you are ready to perform the command, simply use your Shortcut Keys that you just setup.
Friday, October 9, 2009
Change E-mail Format
Do you send e-mails to someone on a mobile device? They probably will be able to read your e-mails easier if you send them as "plain text". You can setup their e-mail account so that they always receive your e-mails as plain text, without you having to remember each time you send them an e-mail.
To do so, follow these simple steps:
Open your Contacts Folder in Outlook.
Double-click the desired contact.
Double-click the email address in the top right section of the contact. (You may have to click the drop down to select an alternate address)
From the "Internet Format" drop down, choose "Send Plain Text only".
Click OK.
Save and Close the Contact.
Now the recipient will always receive your e-mails as plain text.
Wednesday, October 7, 2009
Outlook Calendar Count Down
Outlook doesn't support creating calendar items that countdown (or count up) to a specific date. You'll need to create each item individually. The easiest way to do this is outside of Outlook, using a program like Excel, and import the file to the Calendar. You can use this method with any version of Excel and Outlook, although some steps might be slightly different in older versions of either program.
If you have another spreadsheet program, such as Works, you may need to save it as a CSV or text file to import into Outlook.
Create your series in a spreadsheet program - Excel makes it very easy because it allows you to drag and fill cells in a series, changing the numbers in each row. At the very least you need two columns, Date and Subject. (Outlook uses "Start Date" as the name of the date field.)
Tip: A Categories field will make it easier to delete the items if you make a mistake when importing. If you want to use other fields, create one sample record in an new calendar folder and export it to Excel so you know what fields you need. This will eliminate the need to map fields during the import process.
To begin with "today" in Excel, press Ctrl+; (semi-colon) in the first data row of the date column.
Select the cell and drag down to fill the column with consecutive dates, stopping at the date you are counting down to. Common Excel tricks such as entering two non-consecutive dates in a column and dragging allows you to create a pattern, such as weekly or every other day. (You can use this with birthdays too.) If the fill doesn't use a series, click on the Smart tag and choose series.
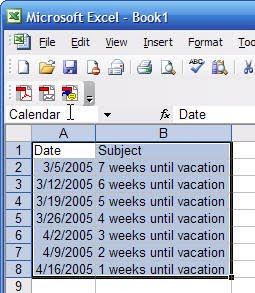
Go to the last date and enter your subject line. Use a number as the first or last character and Excel will complete the series when you drag. Either type the subject line twice or drag it up one cell and change the 0 to 2, as in the screenshot.
Select both cells in the subject column and drag up. Excel will complete the series.
Select the entire used range and type a name for it in the named range field above column A.
Save and close the workbook.
Now it's time to import it into Outlook.
Select File Import and Export
Select Import from another program or file.
Select the program or file type. In this example, we're using Excel to create the file, so we choose Microsoft Excel.
Browse for the file. (Make sure the file is Closed in Excel or you will receive an error.)
Select the Calendar folder you want to Import the file into.
Click to check the box beside Import [named range] to [folder] and if fields need mapped the Map Custom fields dialog opens.
Outlook doesn't recognize Date, so you will need to drag it to "Start Date" and Outlook will add it to the Mapped From column next to Start Date.
If you have another spreadsheet program, such as Works, you may need to save it as a CSV or text file to import into Outlook.
Create your series in a spreadsheet program - Excel makes it very easy because it allows you to drag and fill cells in a series, changing the numbers in each row. At the very least you need two columns, Date and Subject. (Outlook uses "Start Date" as the name of the date field.)
Tip: A Categories field will make it easier to delete the items if you make a mistake when importing. If you want to use other fields, create one sample record in an new calendar folder and export it to Excel so you know what fields you need. This will eliminate the need to map fields during the import process.
To begin with "today" in Excel, press Ctrl+; (semi-colon) in the first data row of the date column.
Select the cell and drag down to fill the column with consecutive dates, stopping at the date you are counting down to. Common Excel tricks such as entering two non-consecutive dates in a column and dragging allows you to create a pattern, such as weekly or every other day. (You can use this with birthdays too.) If the fill doesn't use a series, click on the Smart tag and choose series.
Go to the last date and enter your subject line. Use a number as the first or last character and Excel will complete the series when you drag. Either type the subject line twice or drag it up one cell and change the 0 to 2, as in the screenshot.
Select both cells in the subject column and drag up. Excel will complete the series.
Select the entire used range and type a name for it in the named range field above column A.
Save and close the workbook.
Now it's time to import it into Outlook.
Select File Import and Export
Select Import from another program or file.
Select the program or file type. In this example, we're using Excel to create the file, so we choose Microsoft Excel.
Browse for the file. (Make sure the file is Closed in Excel or you will receive an error.)
Select the Calendar folder you want to Import the file into.
Click to check the box beside Import [named range] to [folder] and if fields need mapped the Map Custom fields dialog opens.
Outlook doesn't recognize Date, so you will need to drag it to "Start Date" and Outlook will add it to the Mapped From column next to Start Date.

Click Finish to import your items.
Friday, October 2, 2009
PowerPoint Object Alignment
You can easily align objects to the left, right, or center.
To do this, follow these steps:
Select your objects by clicking each one while holding the Shift Key.
Click the Draw button. It's located near the bottom-left of your screen.
Select Align or Distribute.
OR Click the Option of your preference, such as Left Align, Right Align etc.
The object(s) will be automatically aligned.
Change Sentence Case in Word
What's the quickest way to change an entire sentence to UPPERCASE, lowercase, or Block Letters?
Here's how you do it.
Select the sentence you want to change.
Hold down the Shift key.
Press F3.
Each time you press F3 it will change the UPPER, lower or Block Case, like this.
Shift + F3, Everything is CAPITAL
"SELECT THE SENTENCE YOU WANT TO CHANGE"
Shift + F3, all letters are in Block.
"Select The Sentence You Want To Change"
Shift + F3, all letters are in lowercase.
"select the sentence you want to change"
Subscribe to:
Posts (Atom)

-
 I often hear people say "I no longer see the Forward, Reply, and Reply to All buttons on my emails. How do I get this information back?...
 -
I've had a few people ask me lately how to filter lists using Excel. It really is as simple as clicking a button on the Ribbon. If you...
-
Are you Left Handed? I mean truly Left-Handed, meaning you write and use the mouse with your Left Hand? If you are and you haven't setup...
