Often there are times when you need to send a file in which it cannot be edited. One of the easiest and most universal ways to do this is to create a PDF file format. PDF stands for Portable Document Format.
Adobe Reader is the most widely used software allowing users to view PDF file types, and it is FREE. There are other programs available, but you will notice that Adobe Reader is often the program that is pre-installed on new computers and most often used by businesses. Most of you have probably used this program.
However, the question of the day is "How do I create a PDF file?"
There are many ways to create a PDF file.
1) Use a Scanner that will save the file as a PDF
There are many drawbacks to this - the scanners can be expensive and the document must be printed prior to running through the scanner.
2) Use Adobe Writer
This is a separate program that must be purchased and is rather expensive. However, the advantage to having this program is that you can Edit certain PDF files (as long as they were not scanned as an image and as long as they are not protected).
3) Users with Microsoft Office 2007® may install the Add-in that allows files to be saved as a PDF.
4) Download a FREE PDF Creation software
There are many PDF Creation software programs that can be downloaded FREE from the Internet. This, in my opinion, is the best option for most people.
Some of the FREE programs available include CutePDF, PrimoPDF, and pdf995. I have found these to be very small installations and very user friendly programs. To save the file as a PDF, most of these programs use the Print option which then creates the PDF.
With technology evolving so quickly these days, it is hard to keep up. I hope this has given you some good options on PDFs.
Wednesday, August 26, 2009
Monday, August 24, 2009
Kids and Internet Safety
It is no surprise that our kids know how to surf the Internet better and faster than we do - they've grown up with it... they don't know a world without it.
Unfortunately, there are a lot of online predators and I've found that SafeKids.com has some great resources for helping parents become educated about the Internet. It explains how to communicate with kids and helps kids and parents know what to look for when it comes to safety.
Click the link below for some Safe Blogging and Social Media Tips from SafeKids.com.
How to Add Watermarks
Have you ever wanted to add a Watermark to a Word document and didn't know how? It's really quite simple.
With your document open, simply click on View Header & Footer.
From there, your document text will appear to be "shaded" - this helps you to see the Header or Footer information with which you are working.
Simply click Insert Picture and then choose to insert a File on your Computer or to choose a Graphic from Clipart. Once you find your Graphic, double-click to insert it into your Header & Footer area.
Next, Right-Click the Graphic and choose "Format Picture" from the sub-menu.
If you are not already, be sure and click on the "Picture" Tab. In the middle of this screen, you will see Image Control / Color. Click on the Drop-Down and choose "Washout".
Click OK to return to your document.
Notice that the image is now very light in color. Now, simply close your Header & Footer by clicking on the CLOSE button on the Toolbar.
Once back in your document, you will notice that the Image is behind the text of your document and shows up as a Watermark.
A great resource for Images is AZVirtual.com.
Monday, August 17, 2009
How to Learn Word - Select Text
In this blog, I will show you very quickly How to Learn Word - Select Text.
Microsoft Word, and other similar word processing programs, allows you to select text in many different ways depending on your needs. As with most software these days, there are many ways to do the same thing. I will mention a few.
1) To select a single letter, number, or symbol, you will need to Click and Drag your mouse to highlight the item.
2) To select an entire word, simply Double-Click the word.
3) To select a line, move your mouse to the left margin (the mouse will turn into a right-pointing arrow) and Single Click.
4) To select a paragraph, move your mouse to the left margin (the mouse will turn into a right-pointing arrow) and Double-Click.
5) To select the text of the entire document, move your mouse to the left margin (the mouse will turn into a right-pointing arrow) and Triple-Click.
There may be times when you do not wish to select an entire paragraph, or the entire document, but need to select a particular sentence or a few words. To do this, you will Click and Drag your mouse just as you do in selecting a single character.
Often times people have difficulty doing this. A hint I like to give to my trainees is to use your Arrow Keys on the keyboard. To do this simply place your cursor in the desired position and while Holding the Shift Key, use your Arrow Keys to move the highlighted (selected) area to the position of your choice.
How to Learn Word is to take things one topic at a time. Microsoft Word, and many other Microsoft Office programs, is a very complex program that can do many valuable things - but when people are overwhelmed, they tend to not use the program to its fullest.
Bottom line on How to Learn Word - take it one step at a time.
Friday, August 7, 2009
Clear History in Internet Explorer
Simply put, History Adds Up! If you surf the net on a regular basis and do not Clear your History, you will create a HUGE History File; thus, making it difficult to find pages, not to mention the hard drive space you could be taking. You should NOT use your History as a way of finding Internet pages, use the Favorites instead.
On a regular basis (at the very least, monthly), you need to follow these steps:
Open Internet Explorer.
Choose Tools Internet Options.
In the Internet Options Window, simply click "Delete" in the Browsing History area. Depending on how long it has been since you last performed this option, this may take a few minutes.
Once completed, click the OK button to exit the Internet Options Window.
Outlook Recurring Appointments
Did you know that you can setup recurring appointments in Outlook? I have seen many people forget meetings, appointments, etc - and these are the ones that happen on a regular basis. Our lives are too busy these days, so we need to learn to take advantage of the power of Outlook.
To setup a Recurring Appointment (one that happens every month, for example), follow these steps:
Open your Calendar.
Double Click the date of the next appointment (or choose File New Appointment).
Type in the Subject, Location, Date, and Time, as usual.
Click on "Recurrence" on the Toolbar.
Once the Recurrence Windows opens, choose all options that apply to your recurring appointment (for example: Monthly, Every 28th Day, etc).
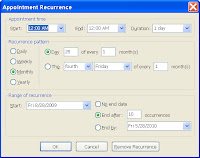
You have the option of setting up the recurrence for a certain time period. You may have the recurrence appear 10 times on your Calendar, for example OR you may choose to have it End after a certain date.
After you have made all of your choices, click the OK button.
Once you have returned to the Calendar, you will see the recurrence details. Click Save and Close and you have now successfully setup a Recurring Appointment.
To setup a Recurring Appointment (one that happens every month, for example), follow these steps:
Open your Calendar.
Double Click the date of the next appointment (or choose File New Appointment).
Type in the Subject, Location, Date, and Time, as usual.
Click on "Recurrence" on the Toolbar.
Once the Recurrence Windows opens, choose all options that apply to your recurring appointment (for example: Monthly, Every 28th Day, etc).
You have the option of setting up the recurrence for a certain time period. You may have the recurrence appear 10 times on your Calendar, for example OR you may choose to have it End after a certain date.
After you have made all of your choices, click the OK button.
Once you have returned to the Calendar, you will see the recurrence details. Click Save and Close and you have now successfully setup a Recurring Appointment.
Subscribe to:
Posts (Atom)

-
 I often hear people say "I no longer see the Forward, Reply, and Reply to All buttons on my emails. How do I get this information back?...
 -
I've had a few people ask me lately how to filter lists using Excel. It really is as simple as clicking a button on the Ribbon. If you...
-
Are you Left Handed? I mean truly Left-Handed, meaning you write and use the mouse with your Left Hand? If you are and you haven't setup...
