If you have another spreadsheet program, such as Works, you may need to save it as a CSV or text file to import into Outlook.
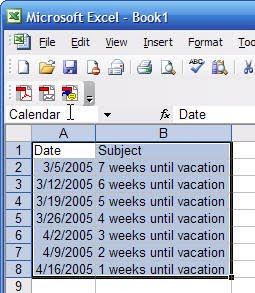
Create your series in a spreadsheet program - Excel makes it very easy because it allows you to drag and fill cells in a series, changing the numbers in each row. At the very least you need two columns, Date and Subject. (Outlook uses "Start Date" as the name of the date field.)
Tip: A Categories field will make it easier to delete the items if you make a mistake when importing. If you want to use other fields, create one sample record in an new calendar folder and export it to Excel so you know what fields you need. This will eliminate the need to map fields during the import process.
To begin with "today" in Excel, press Ctrl+; (semi-colon) in the first data row of the date column.
Select the cell and drag down to fill the column with consecutive dates, stopping at the date you are counting down to. Common Excel tricks such as entering two non-consecutive dates in a column and dragging allows you to create a pattern, such as weekly or every other day. (You can use this with birthdays too.) If the fill doesn't use a series, click on the Smart tag and choose series.
Go to the last date and enter your subject line. Use a number as the first or last character and Excel will complete the series when you drag. Either type the subject line twice or drag it up one cell and change the 0 to 2, as in the screenshot.
Select both cells in the subject column and drag up. Excel will complete the series.
Select the entire used range and type a name for it in the named range field above column A.
Save and close the workbook.
Now it's time to import it into Outlook.
Select File Import and Export
Select Import from another program or file.
Select the program or file type. In this example, we're using Excel to create the file, so we choose Microsoft Excel.
Browse for the file. (Make sure the file is Closed in Excel or you will receive an error.)
Select the Calendar folder you want to Import the file into.
Click to check the box beside Import [named range] to [folder] and if fields need mapped the Map Custom fields dialog opens.
Outlook doesn't recognize Date, so you will need to drag it to "Start Date" and Outlook will add it to the Mapped From column next to Start Date.

Click Finish to import your items.


No comments:
Post a Comment