I often hear people say "I no longer see the Forward, Reply, and Reply to All buttons on my emails. How do I get this information back?"
Something has happened to change your View options, thus, not showing the Standard Toolbar.
In the View menu click Toolbars and click on "Standard." This will show the Standard Toolbar with the Forward, Reply, and other buttons.
It's that simple.
UPDATE 11/29/2017:
For newer versions of Outlook, there isn't as much possibility that you can drag the Reply buttons off of the toolbar. If you do not see the Forward, Reply, and Reply All buttons, you probably have just minimized the "Message" Ribbon.
If this is the case, simply double-click the "Message" Tab to open the Ribbon. If you single click, the Ribbon will open, but will close again after you've used it.
Your buttons have now returned!
Again, it really is that simple.
Please Like, Comment, and Share this post if you found it helpful.
Add Row Numbers in Excel
There are any number of formulas you can use in column A that will return a row number.
Perhaps the easiest is to use the ROW function, like this:
=ROW( )
This formula returns the row number of the cell in which the formula appears.
If you want to offset the row number returned (for instance, if you have some headers in rows 1 and 2 and you want cell A3 to return a row value of "1", then you can modify the formula to reflect the desired adjustment:
=ROW( )-2
Of course, the ROW function isn't the only formula that will perform this function. Look for more Go Ask Debbie Tips on using Excel formulas and functions directly at Go Ask Debbie.
Add a Graphic to your Email Signature
To add a little more personality to your Email Signature, you may want to add a Graphic.
It may seem complicated, but is actually quite simple. Just follow these steps:
In Outlook, go to Tools Options.
Once in the Options Dialogue Window, click on the Mail Format Tab.
On the Mail Format Tab, click on "Signatures" - the button is located at the bottom of the screen.

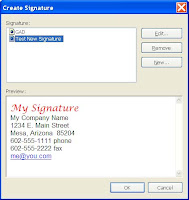
From there, you may Edit a Current Signature or Choose to Create a New Signature.
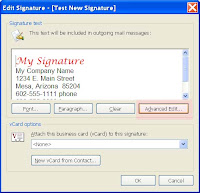
Once in the Signature Window, click on the "Advanced Edit" button. This will open your current HTML editor, which will be Microsoft Word for most people.

You will see your Signature open in a Word window. Place your cursor in the location you wish to place your Graphic.
Choose Insert Picture From File (assuming you are inserting something other than Clipart).
Edit the size of your graphic, if needed. Click on the Save Icon within Word. And click the OK buttons all the way back to your Tools Options window. At this point, Outlook defaults your current signature for New Messages - choose the appropriate options you wish and click OK.
Now your Signature has a Graphic and looks more professional!
It may seem complicated, but is actually quite simple. Just follow these steps:
In Outlook, go to Tools Options.
Once in the Options Dialogue Window, click on the Mail Format Tab.
On the Mail Format Tab, click on "Signatures" - the button is located at the bottom of the screen.

From there, you may Edit a Current Signature or Choose to Create a New Signature.
Once in the Signature Window, click on the "Advanced Edit" button. This will open your current HTML editor, which will be Microsoft Word for most people.

You will see your Signature open in a Word window. Place your cursor in the location you wish to place your Graphic.
Choose Insert Picture From File (assuming you are inserting something other than Clipart).
Edit the size of your graphic, if needed. Click on the Save Icon within Word. And click the OK buttons all the way back to your Tools Options window. At this point, Outlook defaults your current signature for New Messages - choose the appropriate options you wish and click OK.
Now your Signature has a Graphic and looks more professional!
PowerPoint Presentation Shortcuts
Most people know how to scroll through a PowerPoint Presentation using the Mouse to move Forward from Screen to Screen. However, when it comes to other things, most people tend to get stuck.
Here are some very easy Keyboard Shortcuts that will help you move through your presentation like a Pro!
Press N: Moves you to the next slide.
Press P: Moves you to the previous slide.
Enter the slide number, press ENTER: Moves you to that specific slide.
Press ESC: Cancels a slide show.
Press B: Blanks your presentation with a black screen. Press B again to return.
Press W: Blanks your presentation with a white screen. Press W again to return.
Press SHIFT+F10: Displays the shortcut menu.
Transpose Columns in Excel
Sometimes data that you have in Columns may look better in Rows, or vice versa.
To transpose Columns to Rows (or Rows to Columns) in Excel, is very easy. To do this, follow these simple steps:
1. Highlight the data you wish to transpose.
2. Click the Copy button.
3. Click into an empty cell (Note: it must be in a location separate from your current data or you may run into problems).
4. Right-click and choose "Paste Special".
5. On the Paste Special sub-menu, click the "Transpose" check box and click OK.
Remember, for this to work your data must truly be in a data format. If there are Blank Rows or Columns and/or the data is all in One Column or Row, the Transpose feature will not know what to do with your data.
Outlook Fax Numbers as E-mails
How many times have you tried to send an e-mail, only to have a FAX number show up in the E-mail field? Since Outlook is setup to FAX electronically, FAX numbers will show up when trying to send e-mails.
To avoid this, try one of these options:
1. Type the FAX number for your Contacts in a field OTHER than the FAX field.
OR
2. Type an Alpha Character in front of the Fax number (such as: FAX623-555-1111). This will trick Outlook into thinking this is not a valid Fax number and will stop it from appearing in your E-mails.
OR
3. There are software programs you can purchase that will automatically do this for you, but there will be a cost involved. So, I recommend one of the above "quick-fixes".
Outlook 2007 Calendar Invitation Bug
When updating a Calendar Invitation, there are times you do not want to Send the Update to everyone invited. With prior versions of Outlook, you were given options when Saving. Unfortunately, Outlook 2007 missed this crucial step.
Let's say, for example, you want to add some Notes that you do not want all Attendees to see.
If clicking the X to close the form does not offer the "Save, no updates" option, follow these steps:
Click Save.
Choose the "Don't save but keep open" option.
Click X to close.
Choose the "Don't Save" option.
Open the meeting - it should have your Notes saved but no update gets sent. Hopefully this will be fixed in the next version of Outlook.
Edit a PowerPoint Show
Have you ever received a .PPS file and wanted to change it or open it directly in PowerPoint?
You can do this a few different ways, but one fast way is to Right-Click on the File Name (MySlideShow.pps for example) and choose "Rename".
Rename the file with .PPT (MySlideShow.ppt) as the file extension, replacing the .PPS.
Now, when you double-click the file, it will open using PowerPoint and you may edit the file from there.
Subscribe to:
Comments (Atom)

Most Popular
-
I often hear people say "I no longer see the Forward, Reply, and Reply to All buttons on my emails. How do I get this information back?...
-
Are you Left Handed? I mean truly Left-Handed, meaning you write and use the mouse with your Left Hand? If you are and you haven't setup...
-
I've had a few people ask me lately how to filter lists using Excel. It really is as simple as clicking a button on the Ribbon. If you...


