Many people are familiar with online e-mail accounts that provide access from anywhere you have Internet access. These accounts include Gmail, Yahoo! Mail, and others.
If you like the options with selecting multiple e-mails and performing a function (such as Delete or Move), then you'll probably like this tip.
To create a "Check Box" field in Outlook, follow these steps.
Right-click on the Field Header Row.
Select the "Field Chooser" option from the menu.
The "Field Chooser" window opens to the left. In the window, click on the "New" button in the lower left corner.
Type a Name for the field. In this example, we used "CheckBox."
Select "Yes/No" in the "Type" field and leave the format as "Icon."
Click on the "OK" button and close the "Field Chooser" window.
Click and drag the new field onto the Field Header Row. (The gray area at the top of the e-mail list. It's the row that includes the words "From," "Subject," and others.)
Close the Field Chooser window.
Notice the new field is now available, but may not have a checkbox until one has been selected.
Select any and all of the e-mails with the "CheckBox" field and then sort by the column by clicking on the column header.
Now that the e-mails are sorted, you may select them all using the"Shift" key and then press the "Delete" key or move them to a folder you wish.
NOTE: If the field does not allow you to check the box, you will need to turn on the "In Field Editing." To do so, right-click on the Header Row and select "Customize Current View." Click on the "Other Settings" button and select the check box "Allow in-cell editing." Click the "OK" buttons to save the changes and return to Outlook.
Friday, December 31, 2010
Friday, December 24, 2010
Tab Browser Tip
In the newer versions of Internet Explorer, FireFox, and other Tab Browsers, windows are now opened within Tabs.
Not everyone I know has converted to Tab Browsers and even if they have, they still may not use the Tabs. The Tabs help run windows more efficiently and thus, users can browse the Internet a bit faster.
But, what if you open a lot of Tabs and then only need to use one? It can be tedious to close each individual Tab by clicking on the "X" in the upper right corner of each Tab.
However, there is a MUCH easier way!
Simply right-click on the Tab you wish to retain. On the shortcut menu that opens, select the "Close Other Tabs" option.
All other Tabs are closed and the only remaining Tab is the Tab in which you right-clicked.
It's that simple!
Friday, December 10, 2010
Word 2007 Quick Tip
Word 2007 has a handy feature that can quickly decrease your document by one page, if needed.
Let's say you have a 5 page document, but you need it to be 4 pages to fit into a specific book or presentation.
Click on the "Office" button, hover to "Print" and select the "Print Preview" option.
In the "Print Preview" window, click on the "Shrink One Page" button in the "Preview" group of the ribbon.
The document automatically reduces the size and spacing of the text slightly to decrease the document by one page.
NOTE: If your document requires specific size fonts, you may not want to use this option.
Saturday, November 13, 2010
High Tech Gifts for Kids for the Holidays
This Christmas kids are going high-tech. A recent survey by The Telegraph, UK, lists Apple products at the top of the list. The survey results show the following top 10 high tech gifts, as requested by 2,138 children surveyed.
1) iPhone 4 (14%)
2) iPod touch (13%)
3) iPad (12%)
4) Kinect for Xbox (6%)
5) Zhu Zhu Pet Hamsters / Kung Zhu Hamsters (5%)
6) Flip Video Camera (4%)
7) Toy Story 3 Jet Pack Buzz Lightyear (4%)
8) PlayStation Move (4%)
9) LEGO Harry Potter Years 1-4 Video Game (3%)
10) Barbie Video Girl (3%)
Each of these gadgets may or may not be appropriate for children of all ages.
Click here to read a more detailed list as well as my recommendations on age appropriateness.
Friday, November 5, 2010
PowerPoint Subliminal Messages
Used in the right circumstances, subliminal messages can be humorous. With PowerPoint, it is very easy to create subliminal messages during a presentation.
Read more...
Read more...
Tuesday, November 2, 2010
Friday, October 15, 2010
Word Numbering Tip
How many times have you had a numbered list in Word and then decided you needed a paragraph of text in the middle of the numbered list? Did the numbering start over at "1?"
Depending on when you numbered the list and when you entered the paragraph, the list may start over at the number "1."
If this happens, simply right-click on the numbered item after the inserted paragraph. The shortcut menu appears.
Select "Continue Numbering" from the menu.
The numbered list will continue from the last number prior to the inserted paragraph.
Friday, October 8, 2010
October is National Cyber Safety Awareness Month
October is National Cyber Safety Awareness Month and that means education for not only children, but parents as well. A national survey showed that only between 4 and 8 percent of adults could correctly identify chat acronyms.
Madison Meadows Middle School conducted a “Cyber Bullying” educational night for parents on Monday and will be hosting another meeting next week for the students. The presentation is part of the Arizona Attorney General office’s “Internet Safety Guide for Parents.”
First and foremost, parents must talk to children openly. Let them know about Internet dangers and that people aren’t always whom they say they are. Something that sounds innocent can turn into something dangerous.
Help children understand that anything posted online can never been undone. Even if a picture was posted and then deleted, someone could have printed it or shared it with someone prior to it being deleted. The Internet is not a place to post things that would normally be kept in a diary. Private thoughts and subjects should be kept in a private place, like a diary or within the family.
If your child wants to create a blog or join a social network, help them understand that blogs and social media are places to share thoughts and comments about particular topics in which they have interest. However, the child should never share any personal information such as real name, address, school, phone number, or family information. Even something as innocent as posting that the family is going on vacation can open up the fact that the house may be empty for a specific time period.
Parents can install software filtering out adult content, but often children know more about computers these days than do the parents and you risk the possibility of the child uninstalling or hacking the computer to get around these security features. Nothing can replace open communication between parents and children.
Some alarming facts that every parent should know were shared in the Meadows’ meeting and are posted in the Internet Safety Guide, also available online at http://www.azag.gov/.
1 in 7 young people has received unwanted sexual solicitations online.
One third of these solicitations (31%) were aggressive and involved attempted, offline contact with youth.
In more than one quarter (27%) of incidents solicitors asked youth for sexual photographs of themselves.
1 in 3 young people has been exposed to sexually explicit materials online without seeking or expecting them.
1 in 11 young people has been threatened or harassed online.
The Arizona Attorney General’s office is available to present training on Internet Safety to any church, school, or community group. Contact the office at 602-542-2123 or 800-352-8431.
Please treat National Cyber Safety Awareness Month as time to educate yourself by researching online and to communicate with children about cyber safety.
Saturday, October 2, 2010
Dismissing Reminders in Outlook
Why would you want to dismiss reminders you ask?
How many times have you gone on vacation only to come back a week later and open Outlook with hundreds of reminders popping up?
Instead, follow these steps to turn them off while on vacation.
Click on "Tools," "Options."
Click on the "Other" tab and click on the "Advanced" button.
Remove the check for "Display Reminders."
NOTE: Depending on the version of Outlook, you may need to click on the "Reminder Options" button to get to the dialog with the "Display Reminders" option.
Click on the "OK" button to save the changes and return to Outlook.
This will delete any and all past due reminders as well as any reminders while you are on vacation.
When you return from vacation, don't forget to turn it back on!
HINT: You may want to send yourself an e-mail for the day you return. Before hitting the "Send" button, click on the "Options" button and select "Do Not Deliver Before" and place the date you return in the date field. Click the "OK" button and send the e-mail.
Friday, October 1, 2010
Friday, September 24, 2010
Green Word Tip
Have you ever printed a document only to remember that you forgot to print that one last line? Save a tree and save some ink with this tip.
Instead of reprinting the entire page, print only the last line.
First, open the document and insert text of the last line.
Next, highlight the rest of the text on the page and change the format to "White" text.
Insert the printed page (the one with the missing line) into the printer.
Finally, select "File" and then "Print." On the "Print Dialog" window, type in the page number and click on the "OK" button to print.
HINT: Word 2007, click on the "Office" button, hover to "Print" and select the "Print" option. Follow the steps above once the "Print Dialog" window opens.
Since white text does not print, the only thing that will print is the last line. Now, the entire page is printed correctly and you've saved some paper and ink.
Friday, September 17, 2010
Word Tables Tip: Delete the Blank Page After Table
John wrote, "Why does a blank page print after my table?"
This is caused as Word inserts a "Return" after every table created. There are a few ways of handling this.
First, select only the pages you want to print. For example, if the table is on Page 14 of your document, print only pages 1 through 14. This will stop Page 15 (the blank page) from printing. Do this by selecting "File Print" and in the "Print" dialog window, type 1-14 in the "Pages" field.
You could change the margins, but often when this happens is when you've created a table specifically formatted for specialty paper such as labels.
Another easy way is to change the size of the font for the Paragraph marker (or "Return").
First, if you cannot see the Return, turn on your "Show/Hide" by clicking on the "Paragraph" button on the standard toolbar.
Highlight the "Return" and change the font to something very small, such as "4 point," by clicking on the font size on the formatting toolbar and changing the number to "4."
Wednesday, September 15, 2010
Change Gridline Colors in Excel 2007
This is a happy little feature that was added in Excel 2007. Now you have the ability to change gridline colors in Excel 2007.
To do so, follow these steps:
Click on the "Office" button and click on the "Excel Options" button.
Select the "Advanced" tab from the left menu and scroll to the "Display Options for this Worksheet" area. The gridline color option is located in the second section of "Display Options."
Click on the drop down to select a color. Choose any color you want.
Click on the "OK" button to save the changes and exit the "Excel Options" window.
The gridline colors are now as you selected.
HINT: This may be helpful for situations where you have changed the background color to something light blue; thus, making the gridlines non-viewable.
Here's the caveat: only the selected worksheet is changed. To change each sheet, you must select each sheet name from the drop down by the "Display Options" header and then change its corresponding color.
NOTE: Each new worksheet will display the gridline colors as the default light blue color. You are not changing the default by selecting this option.
It's that simple to change gridline colors in Excel 2007.
Thursday, September 9, 2010
7 Easy steps to create an Excel Macro - Slideshow
In this easy to follow slideshow, I show you the 7 easy steps to create an Excel macro.
Macros can be overwhelming, but when you take it step by step it really is simple.
Click here to view the slideshow.
Macros can be overwhelming, but when you take it step by step it really is simple.
Click here to view the slideshow.
Wednesday, September 8, 2010
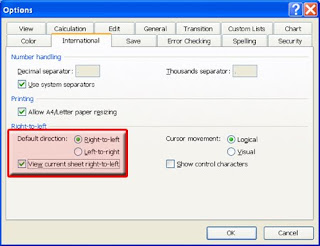
Change Excel to International View
Intrenational users sometimes view things differently than here in the US. But, did you know you can change Excel to International View?
Here's how:
Click on the "Tools" menu and select "Options."
Click on the "International" tab and select the "Right to Left" checkbox. If you want the current spreadsheet to change as well, click on the checkbox for "View current spreadsheet right to left" also.
All future spreadsheets will change to "Right to Left" view with Cell A1 on the right side of the screen as well as the row numbers.
To change it back, simply uncheck the above selections and click on the "Left to Right."
As always, make sure you click on the "OK" button to save the changes and close the "Options" window.
It's that simple!
Thursday, August 26, 2010
Facebook Places - Privacy settings that are not private
This week, Facebook added a feature called "Places" where users may post their current location, using a mobile device.
Facebook hasn't exactly excited its users when it comes to Privacy Settings and I think they missed on this one too. "Places" is enabled by default. And, not only is it enabled, but the Privacy Settings allows "Friends" to post another Friend's location. To me, these are privacy settings that are not private.
If you don't like people knowing every move you make, I would recommend changing the settings.
To do so, follow these steps:
Click on "Accounts" on the upper right corner of Facebook and select "Privacy Settings."
In the Privacy Settings window, click on "Customize" on the lower part of the screen.
In the "Things I Share" section, scroll to "Places I check in to" and change the option to "Me Only."
Then, uncheck the "Include me in 'People Here Now' after I check in" dialog box. (See screen shot below)
In my opinion, Facebook should have changed the default setting. But, I don't work for Facebook, I'm only here to provide tips to computer users. So, I hope this helps with everyone's privacy.
***UPDATE 8/27/2010***
There is another option in the section below "Things others share." The safest option is to select "Disable" from the "Friends can check me into Places" drop down.
Thursday, August 5, 2010
Watch movies on your iPod
Do you watch movies on your iPod? And do you want to watch music videos? If you love gadgets and have an iPod with movie capabilities, you'll want to add as many movies and music videos to your library as you can. The iPod has a great video screen, maybe smaller than some of the new smartphones, like the iPhone, but it's still a nice portable device for music and movies.
But, did you know that you don't need to purchase movies through iTunes? iTunes can be a great resource for music and movies, but what if you find a movie on YouTube that you want to place on your iPod?
It's actually very simple.
There are many ways to convert movies for the iPod, but I'm going to give an example using one of the most used players. A name you're probably familiar with, Real Player.
If you do not already have Real Player installed on your computer, download and install Real Player.
Now, you can do this many ways, but we'll provide the example of downloading a movie from sites such as YouTube.
First and foremost, make sure the movie does not have any copyrights. Movies and Videos on sites like YouTube that are copyrighted will not allow for downloading. However, I am not a lawyer and you always need to be responsible when using any sort of "sharing" website.
That said, visit YouTube and find the movie or music video you want to download.
When Real Player is set as your default player, a small pop-up menu appears in the upper right corner of the video. Click on the "Download this video" link.
Real Player's downloader window opens and begins downloading.
HINT: If you wish to download and convert more than one movie or video, download all files first before continuing to the next step of conversion.
Once the movie or video has been completely downloaded, click on the drop down arrow "Copy to iPod." The default on the drop down is probably "Copy to iPad," but if you click on the drop down arrow, a list is provided. Select "more devices" if you do not see the "Copy to iPod" and search in the more devices list for the iPod option.
Another window opens beginning the conversion process. Depending on the length of the movie or video, this may take some time.
Once completed, iTunes opens with the file added to your library.
It's really that simple.
Enjoy your music, your movies, and your videos all on your iPod - I do!
Sunday, August 1, 2010
Thursday, July 29, 2010
Remove Track Changes in Word
Tracking can be used when documents are shared between customers and clients, for example. When a person on one end makes changes, the person on the other end can see exactly what changes were made. This can be especially helpful during negotiations between two parties. Each side can see what the other side deleted or added.
However, let's say you need to send your resume to a prospective boss. You probably would not want them to see edits and revisions that you made to your resume. If tracking was turned on and the hiring company has their view tracked changes on, they could see everything. Maybe not the most professional look for your resume.
Follow these steps to clear all comments, edits, revisions, and anything else you do not want shared.
Word 2007:
Click on the "Office" button, move to "Prepare" and select "Inspect Document."
Uncheck or check the appropriate areas you want inspected and click on the "Inspect" button at the bottom of the window.
Word will open another window showing you items that you may want to remove.
Click on the "Remove All" button next to the items you wish to remove.
Click on the "Close" button to save the changes and close the Inspect window.
Word 2003:
Click on the "View" menu, hover to "Toolbars" and select "Reviewing."
To accept or reject all changes at once, click the arrow next to "Accept All Changes in Document" or "Reject All Changes in Document."
Tracking changes can be useful, when needed. When not needed, you may want to remove them to have your documents look more professional and hide personal information.
Friday, July 16, 2010
Outlook Date Picker
If you need to view specific dates on a calendar, you can do so quickly by using the Outlook "Date Picker" area.
When you are in the Calendar in Outlook, the left hand side of the screen is filled with the current month and the next two months, in mini calendar form. This area is called the "Date Picker."
Simply click and drag your mouse over the dates you wish to view. Now in a split-second, the calendar will show you those specific dates.
See the picture below (I've highlighted the dates August 3-5):
Excel: Convert Times into Decimals
Many companies use Excel to track timesheets. Employees may not know that the Human Resources Department needs to track time within quarter hours. Some may even want to track in smaller increments.
Here is a quick formula to use so that employees do not have to convert the hours and minutes themselves.
Type this formula (where A1 is the cell containing the time)
=HOUR(A1) (MINUTE(A1)/60)
This will convert 12:35 (time) into 12.58 (decimal).
Then, you might even setup the timesheet to subtract the starting and ending times to calculate the number of hours worked, using the decimal fields.
HINT: Hide these formulas from user forms. You only need to have employees type in the times and not worry about the decimals.
Thursday, July 1, 2010
Thursday, June 17, 2010
Wednesday, June 16, 2010
How to trade in your iPhone 3G
With the release of the iPhone 4G later this month, many people are looking into options for upgrading.
Check out this article on how to trade in your iPhone 3G.
Friday, June 4, 2010
Print Word Documents in Reverse Order
Have you ever had the need to print in reverse order? Microsoft Word allows you to print in reverse order, when needed.
Word 2003 (and earlier versions)
1) Click on Tools | Options
2) Click on the "Print" Tab
3) Click the checkbox for "Reverse Print Order"
4) Click OK to exit and save the settings
Now when you choose to print a document, it will be printed in reverse order. (i.e. If you have a 20 page document, page 20 will print, then 19, etc.)
Word 2007
1) Click the Office icon in the upper left corner
2) Click on the "Word Options" button in the lower part of the screen
3) In the Word Options screen, click on the "Advanced" Tab
4) Scroll down to the Print area and click on the checkbox "Print pages in reverse order"
5) Click OK to exit and save your changes
With any version, when you are ready to print documents in normal order (i.e. 1 through 20, printing page 1 first), you will need to "uncheck" the box.
It's that simple!
Tuesday, June 1, 2010
Sunday, May 30, 2010
How do I use AutoFilter in Excel?
Have you ever searched an entire Excel spreadsheet for data that matched certain criteria?
Use the AutoFilter in Excel and you will be able to find data much quicker.
To do so, simply follow these easy steps:
Excel 2007:
With your list open, click on the "Data" Tab on the Ribbon. On the Data Tab, simply click the "Filter" button.
Notice your data Headers all have Drop Down Arrows next to them.
Now, simply click on the Drop Down Arrow of the Header (or Column) that contains the data in which you wish to search.
You may search for a specific item from the Drop Down list OR you may click on "Number Filters" from the Drop Down and another sub-menu will appear giving you options to search on items Greater than a particular number, etc.
Excel 2003:
Click on the Data Menu and choose "AutoFilter" and then follow the steps above.
It's that simple!
Saturday, May 29, 2010
How to Change the Default Font in Outlook
Many people do not like the Outlook Default Font of Arial. This font is a default because it is easiest to read and is a standard font that will work correctly within most e-mail software programs.
However, if you wish to change the Default Font, you may do so very simply.
To do so, follow these simple steps:
Click on Tools | Options.
Click on the Mail Format Tab.
On the Mail Format Tab, click on "Fonts".
Once in the Fonts Window, you have some options. You may choose to change ALL Fonts or just one or two. Click on Choose Font to change any of the font options: New Messages, Reply and Forwarded Messages, and Messages in Plain Text.
Once you've made your changes, continue to click OK until you are back in your Outlook Window.
It's that simple!
Thursday, May 20, 2010
PowerPoint Master Slides
PowerPoint has the option for "Headers and Footers" much like Word and Excel. However, it is very limited.
PowerPoint 2003 (and older):
Click View | Master and choose which Masters you wish to apply your changes.
Once in the Master, you may add whatever you wish to appear on every slide. For example, you may wish to add a Logo in the background and you may wish to add a Header and/or Footer. Just remember that everything you place on the Master Slide will appear on every slide.
Once you've made your changes or additions, remember to click on View and go back to "Normal". This will ensure you are no longer working in the Master Slides.
PowerPoint 2007:
Click on the "View" Ribbon and choose the Master Slide you wish to apply your changes.
As with 2003, make any changes and additions you wish and they will appear on every slide. However, there is a small difference in 2007: you can make changes to each layout style within the Master Slides.
Now, your PowerPoint presentations can and will look very professional. It's that simple!
Friday, May 7, 2010
Change Windows Folder Image
With all of the folders people create these days, it can sometimes seem very difficult to find a particular folder when searching. This is especially true when searching through the "My Pictures" folder.
However, there is an easy solution. You can change the Folder Image.
The default image for a folder is the picture of a folder. However, the Folder Image is just that, an image.
If you would like to change a particular folder image, follow these simple steps:
1) Right-click on the Folder and choose "Properties"
2) In the Properties window, click on the "Customize" Tab
3) Click on "Choose Picture" and find a picture in your computer that you'd like to use for this particular folder.
4) Click "OK" and notice the changed Folder image.
Continue to do this for any folders you wish to change. It's that simple!
Saturday, May 1, 2010
Go Ask Debbie - May 2010 Newsletter
Here's the link to the latest Go Ask Debbie Newsletter. With Go Ask Debbie, you'll find training and tips on many popular computer software programs, such as Microsoft Word, Excel, Outlook, PowerPoint, Intuit QuickBooks, and more!
http://campaigns.ratepoint.com/campaigns/1f9cbefd5824e3ee65c28cf4cee188e1
Friday, April 30, 2010
"I don't own a computer, how do I get started?"
Statistics show that 76% of the United States population owns a computer. Keep in mind that many people may own two (2) or more computers, and the numbers may amaze you even more.
Many people ask me "how do I get started?" If you've never used a computer, you may need to start at a different level than someone who has a computer at work, but not one at home.
OBVIOUSLY, this post is either for people that have a computer AT WORK or for people to print and give to friends and family that do not have a computer, but want to get started...
In this post, I'd like to give a few helpful tips on where to get started and what to do if you would like to purchase a computer for your home and/or if you would like to get started on the Internet.
First, you need to decide what you will be using the computer for.
Will you use it to create documents or type information? Will you use it for e-mail and the Internet?
If you are new to computers, this information may even be Foreign to you. If you wish to communicate with your family, you will need e-mail and possibly the Internet. E-mail, for beginners, is an electronic method of writing letters to friends and family.
I'll first cover those that want e-mail and Internet access. Today, computers are becoming very reasonable in price. Look to places like Wal-mart, Best Buy, and Fry's Electronics to purchase a computer. The salesman may ask you what you intend to use the computer for, as I have. But, don't entirely rely on the salesman, as they may not know the correct questions to ask or worse, they may just try to up-sell you. If you have a relative or friend that knows even a little bit about computers, you may want to take them with you.
If you plan on using your computer for e-mail and the Internet only, here are some of the basics you will need.
A computer with a processor of 2 GHz is plenty. Memory (or RAM) of 2 GB is enough. In case you will be saving pictures (that relatives and friends may e-mail you), you may want to go ahead and purchase a Hard Drive of at least 300 GB. If you purchase a Desktop computer, you will also need to purchase a Monitor, keyboard, and mouse. These are pretty basic and the salesman can help you; however, if you wear glasses or have any vision issues, you may want to get a Monitor that is at least 21". Monitors are measured similarly to how televisions used to be measured, on the diagonal.
If these terms seem Foreign to you, don't worry, you really don't need to understand them. Just make sure you keep this list with you when purchasing.
The next question you need to ask is "Will I want to take the computer with me while traveling?" If you answered "Yes" to this question, then you will probably want to buy a Laptop. Laptops are convenient and smaller than a desktop computer, as they include the Monitor, keyboard, and mouse all with the Hard Drive. Look for the same basic features I listed above.
The next thing you will need is Internet access. This will be provided by a Cable communications provider, such as Cox Communications. Call around in your local area or better yet, ask a friend. Some cable providers will have a "Bundle" package, where they include your cable, phone, and Internet all at one price; which should be cheaper than purchasing them all separately.
In my next posts, I'll be talking in more depth about the basics of getting started with computers.
Be sure and check back and "Go Ask Debbie!"
Thursday, April 29, 2010
How do I scan an image to be 8-1/2x11 inches?
Darlene writes, "How do I scan an image to be 8-1/2x11"? When I scan the original 8-1/2x11 image, it says it's letter size, but when I send it within the e-mail, it is VERY small."
Darlene, you're not alone. There are so many different scanners out there and even more scanning programs, that it is hard to know everything about each of them.
In this tip, you'll find some helpful things to remember and to look for in your scanning software.
First, all scanning software is different. But, the one thing you need to remember is that when using software to scan a document, most will give you an option to "e-mail" the scanned image. While this may seem the easiest option, there may be problems.
If you choose the "e-mail" option, make sure and look for any window or button that gives you more options. Many programs will show you the size that it will be sending within the e-mail. You might see a Drop-Down arrow for the size. Make sure and choose the "letter" or "8-1/2x11" size option, if that is the size you wish for your document or image.
Remember that this option will make the file size larger; so if you are sending the e-mail to someone that has a slower Internet speed, be careful with this option.
If you do not see the "size" option as a button or within a window, you may want to choose to scan the document as a "Word" file or another option may be "PDF". In these cases, you will probably need to SAVE the file to your computer first. Once you have scanned and saved to your computer, then open your e-mail and send the file as an attachment by choosing the location in which you stored the scanned image.
These tips should get you on the path to scanning documents successfully.
As usual, if you have questions, "Go Ask Debbie!"
Thursday, April 22, 2010
How to Save Pictures from an E-mail
Many people receive e-mails that have beautiful pictures and would like to save these pictures. But, if they are not typical attachments, how do you save them?
The answer is actually quite simple, but may take a bit longer than saving all attachments at once.
If the pictures are not attachments and you can only see them within the e-mail, they are "embedded" within the e-mail. This means that the sender has used some sort of program that creates an HTML e-mail and the pictures are actually within the programming of the HTML.
To save the pictures, simply Right-Click directly on the picture and choose "Save As". Now, simply save them in a folder where you can easily find them. Continue doing this for each picture within the e-mail. The next time you are ready to view the pictures, you do not have to open the e-mail; you may just open the folder where you saved the pictures.
It's that simple!
Thursday, April 8, 2010
How to Create Screen Tips in Word
When sending Word documents electronically, there may be some advantage to providing Screen Tips. Screen Tips are when you "hover" over a word or phrase and a Tip pops up.
These are very simple to setup, just follow these steps:
1) Select the word or phrase you wish to add the Tip
2) Right-click and choose Hyperlink
3) Click "Screen Tip"
4) In the pop-up window, simply type the text (tip) you wish to appear
5) Click "OK"
6) Type a Name for the Tip in the "Address" box and click "OK"
To test the Screen Tip, simply hover your mouse and you should see the Tip.
Thursday, April 1, 2010
Computer Chat and Text Messaging Lingo
As more and more people use chat rooms and text messaging, more acronyms and lingo are created. I've published lists in the past, but this list is a more thorough and updated one.
Just remember, if it's not on the list, try and read it like a sentence (much like trying to figure out a license plate).
Parents, especially, should be aware of these terms.
AAK = Alive And KickingAAR = At Any Rate
AAS = Alive And Smiling
ADN = Any Day Now
AFAIK = As Far As I Know
AFK = Away From the Keyboard
AFN = That's All For Now
AOTA = All Of The Above
a/s/l or asl = Age/Sex/Location - (used to ask a chatter their personal information)
AV = Avatar - Graphical representation (a picture) often used in chat rooms to depict a person that is in the room and chatting.
b4 = Before
BAK = Back At Keyboard (I'm back)
BB = Be Back
BBL = Be Back Later
BBS = Be Back Soon
BCNU = I'll Be Seeing You
b/f = Boyfriend or Best Friend (also shown as bf, B/F, or BF)
BFF = Best Friend Forever
BEG Big Evil Grin
BFN Bye For Now
BMA = Bite My A** (became popular with the Simpson's cartoon show)
boot = To get kicked out of a chat room, or have to restart the computer because you couldn't talk in the chat room anymore.
BR = Best Regards
BRB = Be Right Back
BRH = Be Right Here
BSEG = Big S**t Eatin Grin
BTA = But Then Again
BTW = By The Way
btw = BeTWeen you and me
CRS = Can't Remember S**t
CU = See You
CUS = Can't Understand S**t (stuff)
CNP = Continued in Next Post (seen more on message boards than chat)
CP = Chat Post
CUL8R = See You Later
CUOL = See You On Line
CYA = See Ya
dd, ds, dh = Darling or Dear: Dear Son, Dear Daughter, or Dear Husband. Usually exchanged in family chats.
DDSOS = Different Day, Same Old S**t
DEGT = Don't Even Go There (I don't want to talk about it)
DIKU = Do I Know You?
DIS = Did I Say
D/L, DL, d/l, dl = Downloading, or Download it.
EG = Evil Grin
EM = E-Mail
EMA = E-mail Address (example: ?ema or ema? = what is your email address)
EOT = End Of Thread (meaning end of discussion)
ez or EZ = Easy (one of the really old ones)
F2F = Face To Face
FAQ = Frequently Asked Question
FISH = First In Still Here (someone who is on line TOO much)
FITB = Fill In The Blanks
FOCL = Falling Off Chair - Laughing
Forum = What todays message boards are called
FTS = F*** This S***
*** Anything with an F in it should be questioned ***
FUBAR "Fouled" Up Beyond All Repair / Recognition
FUD = Fear, Uncertainty, and Doubt
FWIW = For What It's Worth
FYI = For Your Information
GA = Go Ahead
GAL = Get A Life
gest = Gesture ... a small multimedia file played over the internet, usually expressing an emotion or comment.
g/f = Girlfriend (also shown as gf, G/F, or GF)
GFN = Gone For Now
GGOH = Gotta Get Outta Here
GMTA = Great Minds Think Alike
GR = Gotta Run
GR&D = Grinning, Running, and Ducking
GTR = Got To Run
GTRM = Going To Read Mail (leaving chat room to check email)
H&K = Hugs and Kisses
hack = person who breaks into software, or disrupts a chat room
HAGD = Have A Good Day
HAGO = Have A Good One
HB = Hurry BackHTH = Hope That Helpshuggles = Hugs
IAC = In Any Case
IB = I'm Back
IC = I See
IDN = I Don't kNow
IDK = I Don't Know
IDTS = I Don't Think So
IANAL = I'm Am Not A Lawyer (expect an uninformed opinion)
ICQ = I Seek You. A computer program used to communicate instantly over the Internet
ILU or ILY = I Love You
IM = Instant Message
IMHO = In My Humble Opinion (or In My Honest Opinion)
IMO = In My Opinion
IOH = I'm Out of Here
IOW = In Other Words
IRL = In Real Life
IYO = In Your Opinion
JAS = Just A Second
JIC = Just In Case
JK = Just Kidding
JMO = Just My Opinion
JW = Just Wondering
k, K, or kk = OK
KIT = Keep In Touch
L8R = Later
LMAO = Laughing My A** Off
LFFAO = Laughing My F***(freaking) A** Off
LOL = Laughing Out Loud
LTNS = Long Time No See
LTS = Laughing To ones Self
LY = I Love Ya
LYL = Love You Lots
MUG = Refers to a new user of that chat program, goes back to Excite VP days when the AV (or icon) that represented someone new was a picture of a coffee mug.
NE1 = Anyone
newbie = refers to a person who is new to an area or technology. Also seen as nube, nooby, nubie, nb, etc.
NFW = No Feasible (or F***ing) Way
NIMBY = Not In My Back Yard
nm, or NM = Never Mind
NP, np = No Problem
NRN = No Response Necessary, Not Right Now
NT = No Thanks
OBTW = Oh, By The Way
OIC = Oh, I See
OF = Old Fart, someone who has been around for a while
OJ or OK = Only Joking or Only Kidding
OL = the Old Lady (Mom or Wife)
OM = the Old Man (Dad or Husband)
OMG = Oh My Gosh
OT = Off Topic
oth or OTH = Off The Hook: Something is really popular, or hot. Very exciting.
otr or OTR = Off The Rack: Saying that something is outside the ordinary.
OTE = Over The Edge (beyond common sense or beyond good taste)
OTOH = On The Other Hand
OTOMH = Off the Top of My Head
OTW = On The Way ... I've sent a file to you, it's "On the way"
P911 = My parents are in the room. P=Parents, and 911=emergency, in other words either drop the subject, or watch the language.
PANS = Pretty Awesome New Stuff (often referring to computer technology)
PCMCIA = Personal Computer Memory Cards International Association
PCMCIA = People Can't Master Computer Industry Acronyms (slang)
PEBCAK = Problem Exists Between Chair And Keyboard
peeps = People
peep this = Hey, listen to this, I've got some interesting news.
PITA = Pain In The Ass
PLZ = Please
PMJI = Pardon Me for Jumping In (when you enter into a new conversation)
poof = when someone leaves a chat room, often seen as *poof* as in boy he *poofed* in a hurry.
POTS = Plain Old Telephone Service
POS = Parents are looking Over my Shoulder
POTS = Parents Over The Shoulder - (My parents are watching, I can't really talk)
PPL = People
QT = Cutie
RFC = Request For Comments
rl or RL = Real Life (as opposed to being online)
r m or RM = Ready Made: pre-existing
ROFL = Rolling On Floor, Laughing
ROTF = Rolling On The Floor (laughing is implied)
ROTFLMAO = Rolling On The Floor Laughing My A** Off
ROTFLMFAO = Rolling On The Floor Laughing F(***ing) My A** Off
RSN = Real Soon Now
r/t = Real Time (also: RT, or rt)
RTFM = Read The "Flippin" Manual (response to beginner question on net, chat, newsgroups, etc.)
RU = aRe yoU?
SEG = S**t Eating Grin
SH = Same Here
SMS = Short Message Service (more cell phones and pagers than chat rooms and the Internet)
SN = Screen Name
SNAFU = Situation Normal, All "Fouled" Up
SO = Significant Other
SOL = S**t Out Of Luck
SOS = Same Old S**t (stuff)
SOTA = State Of The Art (latest technology)
SPST = Same Place, Same Time
SSDD = Same S**t, Different Day
STR8 = Straight (can refer to sex, or DSTR8 as in D**n Straight)
STW = Search The Web
SY = Sincerely Yours
SYL = See You Later
TAFN = That's All For Now
TC = Take Care
TFH = Thread From H*** (a topic or discussion that won't stop - esp. newsgroups)
TGIF = Thank Goodness It's Friday
THX = Thanks!
TIA = Thanks In Advance
TM = Text Message
TMI = Too Much Information
TNT = 'Til Next Time
TPS = That's Pretty Stupid
TPTB = The Powers That Be (can sometimes refer to the people that are running the chat room or server)
TRDMF = Tears Running Down My Face: Can be with either laughter, or due to saddness.
TS = Tough S**t
TSFY = Tough S**t For You
TTFN = Ta-Ta For Now
TTTT = These Things Take Time
TTYL = Talk To You Later
TY = Thank You
TYT = Take Your Time
TYVM = Thank You Very Much
VPPH = Virtual Places Page Host
US = You S**k
usa or USA = Until Sides Ache: Usually used with one of the laughter acronyms such as "lolusa" Laughing Out Loud Until my Sides Ache. I've also heard that some folks substitute ush for "Until Sides Hurt". rotflolush = rolling on the floor, laughing out loud, until my sides hurt.
UV = Unpleasant Visual
UW = yoU're Welcome
UY = Up Yours
vp or VP = Virtual Places: A brand of chat offered by Excite in the late 90s and early 2000.
WB = Welcome Back (you say this when someone returns to a chat room)
WC = WelCome
WEG = Wicked Evil Grin
WEU = What's Eating You?
WFM = Works For Me
WIIFM = What's In It For Me?
WTG = Way To Go
WTF = What The F***
WT? = What The ...? or Who the ...?
WTGP? = Want To Go Private? (move to a private chat room)
WWJD = What Would Jesus Do?
YAA = Yet Another Acronym
YBS = You'll Be Sorry
YL = Young Lady
YM = Young Man
YMMV = Your Mileage May Vary
YR = Yea, Right (sarcastic)
*ys* = You Stinker
YVW = You're Very Welcome
YW = You're Welcome
Remember, this is not a complete list, but it's hard to keep up with all of the lingo. As parents find out meanings, kids keep coming up with new ones. Just try and read the acronym like a sentence (much like trying to figure out someone's license plate) and you'll probably figure them out.
Go Ask Debbie - April 2010 Newsletter
Here's the link to the latest Go Ask Debbie Newsletter. With Go Ask Debbie, you'll find training and tips on many popular computer software programs, such as Microsoft Word, Excel, Outlook, PowerPoint, Intuit QuickBooks, and more!
http://campaigns.ratepoint.com/campaigns/88b3966b44fcf809b47d487c57889efb
Wednesday, March 31, 2010
How to Burn a CD using iTunes
Many people think iTunes is used only to synch their iPods, but it can do so much more.
iTunes is a FREE software program you can download and use to play your music. iTunes also allows you to create Playlists and Burn CDs.
Playlists, simply put, are a compilation of music that you put together. For example: if you have five (5) different albums of music from five (5) different artists, but you only like two (2) or three (3) songs on each album, you can create a "Favorites" Playlist and place only your favorite songs from each album into the Playlist and Burn them to create a CD. Playlists are also used to organize your iPod in the same manner.
To create a Playlist, choose File | New Playlist. A folder called "New Playlist" will be created in the lower left side of your screen under "Playlists". Simply type a name for the Playlist, such as "Jamies Favorites" and press Enter to Save. Now you are ready to add songs to the Playlist.
To add songs, simply choose the songs from your "Music" folder and click and drag them to the newly created Playlist.
Once you have added all of the songs you wish to add, simply Right-Click the Playlist and choose "Burn Playlist to a CD". Depending on the version of iTunes, a window will open asking you which format you choose to create. If you will be using the CD in your car or an older CD player, you will probably want to choose "Audio CD". An Audio CD will be able to be played by most CD players. If you wish to create an "MP3 CD", some CD players may not have MP3 capability.
Choose OK and the CD will begin burning. Once completed, you will receive a message on the screen and your CD will be ejected. Make sure and label your CD and have fun listening!
As always, if you have questions, "Go Ask Debbie!"
Thursday, March 25, 2010
Outlook Calendar Tip
Here's another way of moving around the Calendar that may be quicker for some users.
If you have a view open that shows the mini calendars, you can open a pop-up window that will allow you to move multiple months.
Simply click on the Month/Year Header and you will receive a pop-up window with the three (3) months prior and three (3) months after. Scroll to select the Month you wish.
NOTE: DO NOT release your mouse click, as the pop-up will disappear.
Play with it, you may find it's a faster way of moving around within Outlook.
Thursday, March 11, 2010
How Do I Delete MRU's?
Jerry, of El Dorado, Kansas writes: "How do I delete MRU's?"
MRU's are the "Most Recently Used" files that are stored within Internet Browsers. These can include web pages and other files that used your browser to open them.
There are technical people that will tell you how to change the Windows Registry to clear these files. I'm not a big fan of anyone, even people with some technical experience, changing or editing the Windows Registry in any way, shape or form.
Here are a couple of safer ways to delete MRU's.
1) If you'd like to delete ALL Recent Documents, including Recently Accessed Documents, Programs, and Web Pages, follow these steps:
If you have a question, simply click here to send me your questions. I'll post as many answers as I can in the following Tips e-mail or on my Blog.
MRU's are the "Most Recently Used" files that are stored within Internet Browsers. These can include web pages and other files that used your browser to open them.
There are technical people that will tell you how to change the Windows Registry to clear these files. I'm not a big fan of anyone, even people with some technical experience, changing or editing the Windows Registry in any way, shape or form.
Here are a couple of safer ways to delete MRU's.
1) If you'd like to delete ALL Recent Documents, including Recently Accessed Documents, Programs, and Web Pages, follow these steps:
- Right-click on the Start Button and choose Properties
- On the Start Menu Tab, click "Customize"
- Click "Clear" on the "To remove records of recently accessed documents, programs, and web pages"
- Click OK on this screen and the next screen and all MRU's will be deleted (or cleared)
- Open Internet Explorer
- Click on Tools | Internet Options
- Click on "Settings" in the Internet Browsing area
- Click on the "View Files" button and Windows Explorer will open showing you the list of History and Cookies.
- Simply look for the Domain Name of the MRU you wish to Delete. Once found, click on the file and press the Delete Key.
If you have a question, simply click here to send me your questions. I'll post as many answers as I can in the following Tips e-mail or on my Blog.
Monday, March 1, 2010
Go Ask Debbie - March 2010 Newsletter
Here's the link to the latest Go Ask Debbie Newsletter. With Go Ask Debbie, you'll find training and tips on many popular computer software programs, such as Microsoft Word, Excel, Outlook, PowerPoint, Intuit QuickBooks, and more!
http://campaigns.ratepoint.com/campaigns/49de21f01d97b50c75b37a16552f0cb0
Sunday, February 28, 2010
How to Print Excel Formulas
I have many students that ask me how to create a list of the most used Excel Formulas. There are a few ways...
If you want a list from Microsoft Help, just open your help by pressing F1 or use your Office Assistant. Search for Formulas and Print the Help page.
But sometimes this list isn't entirely what you want. So, you can simply create your own list of formulas and print your list for future reference.
To do so, follow these instructions.
Type a list of the common formulas you use (or use an existing spreadsheet that someone else has created).
Click Tools | Options.
Click on the VIEW Tab.
On the View Tab, check "Formulas" in the Windows Options area of the Tab.
Click OK and you will return to your spreadsheet with the Formulas showing, instead of the results.
It's that simple.
Monday, February 1, 2010
Go Ask Debbie - February 2010 Newsletter
Here's the link to the latest Go Ask Debbie Newsletter. With Go Ask Debbie, you'll find training and tips on many popular computer software programs, such as Microsoft Word, Excel, Outlook, PowerPoint, Intuit QuickBooks, and more!
http://campaigns.ratepoint.com/campaigns/522d5495fb14ed9626097625b3a6b927
Friday, January 29, 2010
Learn Word - Personalized Bullets
We've all seen it, the bullets setup in a Word document that look like someone just chose a template or clicked on the button for bullets on the toolbar. But, if you've seen bullets that have a company's logo or another word or picture, you probably think they had special programming skills... Well, it's actually very simple.
To personalize bullets in Word, follow these simple steps:
1) Highlight the text you wish to add bullets.
2) Go to Format | Bullets and Numbering
3) Click on a Bullet and click on the "Customize" button in the lower right corner of the window.
4) On the Bullet Tab, you may choose from a Character preset within Word OR click on the "Picture" button and locate a picture that you wish to use.
5) Click OK to return to your document and you will see your personalized bullets.
NOTE: If you wish to add a word, on Step 4) Click on the Number Tab and then the Customize button. Next, type in the Word you wish to have for your bullets. Click OK to return.
It really is that simple to personalize bullets in Word!
Thursday, January 21, 2010
Netbook Comparisons
Netbooks are the new Laptops. They are a less expensive option and provide online access to the Internet, including Webmail and many other tools you may use while on the Internet. With all of the new online software, there may not be much of a need in the future to have software installed on your computer - thus, making these Netbooks a very good choice for those "on the go."
Below are a few Netbooks. Important features you may want to compare are Battery Life, Screen Size, Memory, and WiFi compatibility. Read through them to find which one best fits your needs.
Friday, January 15, 2010
Disappearing Zeros in Excel
I hear this question a lot - In Excel, when I type in a number that has Zeros at the beginning (like a Zip Code), the Zeros disappear - how can I get them back?
First, you need to realize that Excel sets a format for every cell. The default format depends on the information you type, as Excel tries to read your mind. Computers are not always good mind readers.
For example: When you type text in a cell, Excel sets the format of that cell to "text". When you type a number, it sets the format of that cell to a number. So, when you type in a Zip Code of "00123", Excel tells you that there are no Zeros needed and places the number "123" in the cell.
A quick fix for this is to Right-Click the cell and choose "Format Cells." In the Format Dialog Box, choose "Custom" and in the "Type" field, type the number of digits for your numbering. So, in the Example above, you would type "00000" as Zip Codes contain five digits.
Once you click "OK", your Disappearing Zeros will Reappear!
If you have a group of cells that do not contain a specific number of digits, then you will need to use a macro. Look for future advanced training on Macros for that fix.
Thursday, January 7, 2010
Online Weight Loss Tracking
Today's resolutions for weight loss can be made a lot easier with online weight loss tracking sites. These sites provide an easy way to enter information such as food you've eaten and they often have caloric information for typical foods, including popular restaurants.
Check out some of these sites and hopefully one of them will fit your needs to meet your goals for 2010!
Spark People
Fit Day
My Health & Fitness
Med Help
Check out some of these sites and hopefully one of them will fit your needs to meet your goals for 2010!
Spark People
Fit Day
My Health & Fitness
Med Help
Monday, January 4, 2010
Go Ask Debbie - January Newsletter
Here's the link to the latest Go Ask Debbie Newsletter. With Go Ask Debbie, you'll find training and tips on many popular computer software programs, such as Microsoft Word, Excel, Outlook, PowerPoint, Intuit QuickBooks, and more!
http://campaigns.ratepoint.com/campaigns/cfd595848f61a7b6f4e04842074b8c36
Subscribe to:
Posts (Atom)
-
I often hear people say "I no longer see the Forward, Reply, and Reply to All buttons on my emails. How do I get this information back?...
-
I've had a few people ask me lately how to filter lists using Excel. It really is as simple as clicking a button on the Ribbon. If you...
-
When Outlook is first setup, the default Auto-Archive is 6 months. This means that e-mails dated 6 months ago will automatically be moved...