If you've been using Microsoft Office 1007 or 2010, you may have seen the Quick Access Toolbar and not known what it was. Or you may be missing the old Microsoft Office Standard Toolbar.
Either way, this Microsoft Office Tutorial is for you.
To learn to customize the Microsoft Office Quick Access Toolbar in 2007 or 2010, watch the video below.
Enjoy!
Showing posts with label outlook help. Show all posts
Showing posts with label outlook help. Show all posts

Outlook Quick Tip: Navigation Pane
Quickly turn the Navigation Pane On or Off by pressing "ALT + F1" and keep more room for reading emails.
This is such an easy tip, but can provide much more room in the Outlook window.
This is such an easy tip, but can provide much more room in the Outlook window.
Outlook Calendar Tip: Date Picker
To quickly view specific days next to each other, follow this tip.
Click on the date in the "Date Picker" window. This is the small calendar(s) usually on the left side of the screen.
Hold the "CTRL" key to select non-consecutive multiple days while clicking on each date.
As you click, each date will appear next to each other in the Calendar view.
It's that simple.
Click on the date in the "Date Picker" window. This is the small calendar(s) usually on the left side of the screen.
Hold the "CTRL" key to select non-consecutive multiple days while clicking on each date.
As you click, each date will appear next to each other in the Calendar view.
It's that simple.
Start Outlook in a Folder other than Inbox
Many people I've trained use the Outlook Calendar to schedule their day. So, this tip is dedicated to those that would like to start Outlook in a folder other than the Inbox.
Click on the "Tools" menu and select "Options."
Click on the "Other" tab.
Click on the "Advanced Options" button in the "General" area.
Click on the "Browse" button in the "Startup in this folder" field.
See image below.

Highlight the folder you want (in our Example above, we would select the "Calendar" folder) and click on the "OK" button.
The next time Outlook is started, the "Calendar" folder will open first.
You may change this option at any time, depending on your usage.
Click on the "Tools" menu and select "Options."
Click on the "Other" tab.
Click on the "Advanced Options" button in the "General" area.
Click on the "Browse" button in the "Startup in this folder" field.
See image below.
Highlight the folder you want (in our Example above, we would select the "Calendar" folder) and click on the "OK" button.
The next time Outlook is started, the "Calendar" folder will open first.
You may change this option at any time, depending on your usage.
Outlook Send a Message to a Category
I've shown how to use the Category feature in the past; but other than sorting, some users aren't sure how else to use this feature.
Let's say you've setup a Category for your son's sports team. When you need to send a message to the team, simply filter your Outlook Contacts by typing the Category name in the "Look For" field and press "Enter."

When the names in the Category appear, press "CTRL A" to select all of the contacts. Choose "Actions" from the menu and select the "New Message to Contact" option.
All email addresses within the Category appear in the "To" field of a new email message window.
Type your Subject Line and email message and press the "Send" button.
It's that simple!
Let's say you've setup a Category for your son's sports team. When you need to send a message to the team, simply filter your Outlook Contacts by typing the Category name in the "Look For" field and press "Enter."
When the names in the Category appear, press "CTRL A" to select all of the contacts. Choose "Actions" from the menu and select the "New Message to Contact" option.
All email addresses within the Category appear in the "To" field of a new email message window.
Type your Subject Line and email message and press the "Send" button.
It's that simple!
Outlook Calendar Tip
I've shown many different ways of changing the appearance of Outlook; but this one is easy and used by many people I've trained over the years - I just had to share it with everyone.
When using the Calendar in Outlook, the default time periods are 30 minute intervals. But, what if you have appointments or other scheduled items that need to be broken down into 15 minute intervals?
Follow this tip to learn how.
With the Calendar open, simply right-click in any blank area.
Select the "Other Settings" menu item.

Click on the "Time Scale" drop down arrow and select the time interval you want to appear.
Notice the interval options are from 1 to 60 minutes. Personalize Outlook's Calendar to fit your needs.
Click on the "OK" button to save the changes.
It's that simple.
NOTE: The only views that show the new time intervals are the "Day" and "Work Week." Or any other personalized views that show the default intervals.
When using the Calendar in Outlook, the default time periods are 30 minute intervals. But, what if you have appointments or other scheduled items that need to be broken down into 15 minute intervals?
Follow this tip to learn how.
With the Calendar open, simply right-click in any blank area.
Select the "Other Settings" menu item.
Click on the "Time Scale" drop down arrow and select the time interval you want to appear.
Notice the interval options are from 1 to 60 minutes. Personalize Outlook's Calendar to fit your needs.
Click on the "OK" button to save the changes.
It's that simple.
NOTE: The only views that show the new time intervals are the "Day" and "Work Week." Or any other personalized views that show the default intervals.
Outlook Quick Tip
Would you like more room on the Outlook Desktop? If so, did you know you can turn the Navigation Pane On or Off, as needed?
Simply press "ALT + F1" to toggle the Navigation Pane On or Off.
Turn it "Off" when you need more space or turn it "On" when you need to see folders.
It's that simple!
Simply press "ALT + F1" to toggle the Navigation Pane On or Off.
Turn it "Off" when you need more space or turn it "On" when you need to see folders.
It's that simple!
Outlook Field Chooser Tip
Many people are familiar with online e-mail accounts that provide access from anywhere you have Internet access. These accounts include Gmail, Yahoo! Mail, and others.
If you like the options with selecting multiple e-mails and performing a function (such as Delete or Move), then you'll probably like this tip.
To create a "Check Box" field in Outlook, follow these steps.
Right-click on the Field Header Row.
Select the "Field Chooser" option from the menu.

The "Field Chooser" window opens to the left. In the window, click on the "New" button in the lower left corner.

Type a Name for the field. In this example, we used "CheckBox."
Select "Yes/No" in the "Type" field and leave the format as "Icon."
Click on the "OK" button and close the "Field Chooser" window.
Click and drag the new field onto the Field Header Row. (The gray area at the top of the e-mail list. It's the row that includes the words "From," "Subject," and others.)
Close the Field Chooser window.
Notice the new field is now available, but may not have a checkbox until one has been selected.
Select any and all of the e-mails with the "CheckBox" field and then sort by the column by clicking on the column header.
Now that the e-mails are sorted, you may select them all using the"Shift" key and then press the "Delete" key or move them to a folder you wish.
NOTE: If the field does not allow you to check the box, you will need to turn on the "In Field Editing." To do so, right-click on the Header Row and select "Customize Current View." Click on the "Other Settings" button and select the check box "Allow in-cell editing." Click the "OK" buttons to save the changes and return to Outlook.
If you like the options with selecting multiple e-mails and performing a function (such as Delete or Move), then you'll probably like this tip.
To create a "Check Box" field in Outlook, follow these steps.
Right-click on the Field Header Row.
Select the "Field Chooser" option from the menu.
The "Field Chooser" window opens to the left. In the window, click on the "New" button in the lower left corner.
Type a Name for the field. In this example, we used "CheckBox."
Select "Yes/No" in the "Type" field and leave the format as "Icon."
Click on the "OK" button and close the "Field Chooser" window.
Click and drag the new field onto the Field Header Row. (The gray area at the top of the e-mail list. It's the row that includes the words "From," "Subject," and others.)
Close the Field Chooser window.
Notice the new field is now available, but may not have a checkbox until one has been selected.
Select any and all of the e-mails with the "CheckBox" field and then sort by the column by clicking on the column header.
Now that the e-mails are sorted, you may select them all using the"Shift" key and then press the "Delete" key or move them to a folder you wish.
NOTE: If the field does not allow you to check the box, you will need to turn on the "In Field Editing." To do so, right-click on the Header Row and select "Customize Current View." Click on the "Other Settings" button and select the check box "Allow in-cell editing." Click the "OK" buttons to save the changes and return to Outlook.
Outlook Calendar Tip
Here's another way of moving around the Calendar that may be quicker for some users.
If you have a view open that shows the mini calendars, you can open a pop-up window that will allow you to move multiple months.

Simply click on the Month/Year Header and you will receive a pop-up window with the three (3) months prior and three (3) months after. Scroll to select the Month you wish.
NOTE: DO NOT release your mouse click, as the pop-up will disappear.
Play with it, you may find it's a faster way of moving around within Outlook.
If you have a view open that shows the mini calendars, you can open a pop-up window that will allow you to move multiple months.

Simply click on the Month/Year Header and you will receive a pop-up window with the three (3) months prior and three (3) months after. Scroll to select the Month you wish.
NOTE: DO NOT release your mouse click, as the pop-up will disappear.
Play with it, you may find it's a faster way of moving around within Outlook.
Outlook Reply Button Missing
I often hear people say "I no longer see the Forward, Reply, and Reply to All buttons on my emails. How do I get this information back?"
Something has happened to change your View options, thus, not showing the Standard Toolbar.
In the View menu click Toolbars and click on "Standard." This will show the Standard Toolbar with the Forward, Reply, and other buttons.
It's that simple.
UPDATE 11/29/2017:
For newer versions of Outlook, there isn't as much possibility that you can drag the Reply buttons off of the toolbar. If you do not see the Forward, Reply, and Reply All buttons, you probably have just minimized the "Message" Ribbon.

If this is the case, simply double-click the "Message" Tab to open the Ribbon. If you single click, the Ribbon will open, but will close again after you've used it.
Your buttons have now returned!

Again, it really is that simple.
Please Like, Comment, and Share this post if you found it helpful.
Something has happened to change your View options, thus, not showing the Standard Toolbar.
In the View menu click Toolbars and click on "Standard." This will show the Standard Toolbar with the Forward, Reply, and other buttons.
It's that simple.
UPDATE 11/29/2017:
For newer versions of Outlook, there isn't as much possibility that you can drag the Reply buttons off of the toolbar. If you do not see the Forward, Reply, and Reply All buttons, you probably have just minimized the "Message" Ribbon.

If this is the case, simply double-click the "Message" Tab to open the Ribbon. If you single click, the Ribbon will open, but will close again after you've used it.
Your buttons have now returned!

Again, it really is that simple.
Please Like, Comment, and Share this post if you found it helpful.
Outlook Fax Numbers as E-mails
How many times have you tried to send an e-mail, only to have a FAX number show up in the E-mail field? Since Outlook is setup to FAX electronically, FAX numbers will show up when trying to send e-mails.
To avoid this, try one of these options:
1. Type the FAX number for your Contacts in a field OTHER than the FAX field.
OR
2. Type an Alpha Character in front of the Fax number (such as: FAX623-555-1111). This will trick Outlook into thinking this is not a valid Fax number and will stop it from appearing in your E-mails.
OR
3. There are software programs you can purchase that will automatically do this for you, but there will be a cost involved. So, I recommend one of the above "quick-fixes".
To avoid this, try one of these options:
1. Type the FAX number for your Contacts in a field OTHER than the FAX field.
OR
2. Type an Alpha Character in front of the Fax number (such as: FAX623-555-1111). This will trick Outlook into thinking this is not a valid Fax number and will stop it from appearing in your E-mails.
OR
3. There are software programs you can purchase that will automatically do this for you, but there will be a cost involved. So, I recommend one of the above "quick-fixes".
Outlook 2007 Calendar Invitation Bug
When updating a Calendar Invitation, there are times you do not want to Send the Update to everyone invited. With prior versions of Outlook, you were given options when Saving. Unfortunately, Outlook 2007 missed this crucial step.
Let's say, for example, you want to add some Notes that you do not want all Attendees to see.
If clicking the X to close the form does not offer the "Save, no updates" option, follow these steps:
Click Save.
Choose the "Don't save but keep open" option.
Click X to close.
Choose the "Don't Save" option.
Open the meeting - it should have your Notes saved but no update gets sent. Hopefully this will be fixed in the next version of Outlook.
Let's say, for example, you want to add some Notes that you do not want all Attendees to see.
If clicking the X to close the form does not offer the "Save, no updates" option, follow these steps:
Click Save.
Choose the "Don't save but keep open" option.
Click X to close.
Choose the "Don't Save" option.
Open the meeting - it should have your Notes saved but no update gets sent. Hopefully this will be fixed in the next version of Outlook.
Change E-mail Format
Do you send e-mails to someone on a mobile device? They probably will be able to read your e-mails easier if you send them as "plain text". You can setup their e-mail account so that they always receive your e-mails as plain text, without you having to remember each time you send them an e-mail.
To do so, follow these simple steps:
Open your Contacts Folder in Outlook.
Double-click the desired contact.
Double-click the email address in the top right section of the contact. (You may have to click the drop down to select an alternate address)
From the "Internet Format" drop down, choose "Send Plain Text only".
Click OK.
Save and Close the Contact.
Now the recipient will always receive your e-mails as plain text.
To do so, follow these simple steps:
Open your Contacts Folder in Outlook.
Double-click the desired contact.
Double-click the email address in the top right section of the contact. (You may have to click the drop down to select an alternate address)
From the "Internet Format" drop down, choose "Send Plain Text only".
Click OK.
Save and Close the Contact.
Now the recipient will always receive your e-mails as plain text.
Outlook Calendar Count Down
Outlook doesn't support creating calendar items that countdown (or count up) to a specific date. You'll need to create each item individually. The easiest way to do this is outside of Outlook, using a program like Excel, and import the file to the Calendar. You can use this method with any version of Excel and Outlook, although some steps might be slightly different in older versions of either program.
If you have another spreadsheet program, such as Works, you may need to save it as a CSV or text file to import into Outlook.
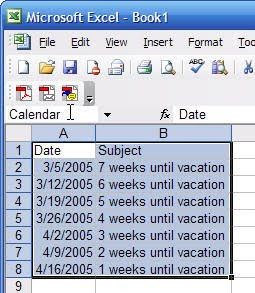
Create your series in a spreadsheet program - Excel makes it very easy because it allows you to drag and fill cells in a series, changing the numbers in each row. At the very least you need two columns, Date and Subject. (Outlook uses "Start Date" as the name of the date field.)
Tip: A Categories field will make it easier to delete the items if you make a mistake when importing. If you want to use other fields, create one sample record in an new calendar folder and export it to Excel so you know what fields you need. This will eliminate the need to map fields during the import process.
To begin with "today" in Excel, press Ctrl+; (semi-colon) in the first data row of the date column.
Select the cell and drag down to fill the column with consecutive dates, stopping at the date you are counting down to. Common Excel tricks such as entering two non-consecutive dates in a column and dragging allows you to create a pattern, such as weekly or every other day. (You can use this with birthdays too.) If the fill doesn't use a series, click on the Smart tag and choose series.
Go to the last date and enter your subject line. Use a number as the first or last character and Excel will complete the series when you drag. Either type the subject line twice or drag it up one cell and change the 0 to 2, as in the screenshot.
Select both cells in the subject column and drag up. Excel will complete the series.
Select the entire used range and type a name for it in the named range field above column A.
Save and close the workbook.
Now it's time to import it into Outlook.
Select File Import and Export
Select Import from another program or file.
Select the program or file type. In this example, we're using Excel to create the file, so we choose Microsoft Excel.
Browse for the file. (Make sure the file is Closed in Excel or you will receive an error.)
Select the Calendar folder you want to Import the file into.
Click to check the box beside Import [named range] to [folder] and if fields need mapped the Map Custom fields dialog opens.
Outlook doesn't recognize Date, so you will need to drag it to "Start Date" and Outlook will add it to the Mapped From column next to Start Date.
If you have another spreadsheet program, such as Works, you may need to save it as a CSV or text file to import into Outlook.
Create your series in a spreadsheet program - Excel makes it very easy because it allows you to drag and fill cells in a series, changing the numbers in each row. At the very least you need two columns, Date and Subject. (Outlook uses "Start Date" as the name of the date field.)
Tip: A Categories field will make it easier to delete the items if you make a mistake when importing. If you want to use other fields, create one sample record in an new calendar folder and export it to Excel so you know what fields you need. This will eliminate the need to map fields during the import process.
To begin with "today" in Excel, press Ctrl+; (semi-colon) in the first data row of the date column.
Select the cell and drag down to fill the column with consecutive dates, stopping at the date you are counting down to. Common Excel tricks such as entering two non-consecutive dates in a column and dragging allows you to create a pattern, such as weekly or every other day. (You can use this with birthdays too.) If the fill doesn't use a series, click on the Smart tag and choose series.
Go to the last date and enter your subject line. Use a number as the first or last character and Excel will complete the series when you drag. Either type the subject line twice or drag it up one cell and change the 0 to 2, as in the screenshot.
Select both cells in the subject column and drag up. Excel will complete the series.
Select the entire used range and type a name for it in the named range field above column A.
Save and close the workbook.
Now it's time to import it into Outlook.
Select File Import and Export
Select Import from another program or file.
Select the program or file type. In this example, we're using Excel to create the file, so we choose Microsoft Excel.
Browse for the file. (Make sure the file is Closed in Excel or you will receive an error.)
Select the Calendar folder you want to Import the file into.
Click to check the box beside Import [named range] to [folder] and if fields need mapped the Map Custom fields dialog opens.
Outlook doesn't recognize Date, so you will need to drag it to "Start Date" and Outlook will add it to the Mapped From column next to Start Date.

Click Finish to import your items.
Outlook Calendar Shortcut
Would you prefer to view 4 days on your Outlook Calendar, instead of the 5 or 7 or 30 day view given as options on the toolbar? Or perhaps 2 or 3 days at a time?
To change the number of days in the view, simply press the ALT key and the number of days you wish to view.
For Example, if you wish to view 9 days, press ALT and 9.
This shortcut works on 1-10 days. (For 10, press the number 0)
To change the number of days in the view, simply press the ALT key and the number of days you wish to view.
For Example, if you wish to view 9 days, press ALT and 9.
This shortcut works on 1-10 days. (For 10, press the number 0)
Outlook Recurring Appointments
Did you know that you can setup recurring appointments in Outlook? I have seen many people forget meetings, appointments, etc - and these are the ones that happen on a regular basis. Our lives are too busy these days, so we need to learn to take advantage of the power of Outlook.
To setup a Recurring Appointment (one that happens every month, for example), follow these steps:
Open your Calendar.
Double Click the date of the next appointment (or choose File New Appointment).
Type in the Subject, Location, Date, and Time, as usual.
Click on "Recurrence" on the Toolbar.
Once the Recurrence Windows opens, choose all options that apply to your recurring appointment (for example: Monthly, Every 28th Day, etc).
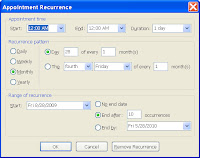
You have the option of setting up the recurrence for a certain time period. You may have the recurrence appear 10 times on your Calendar, for example OR you may choose to have it End after a certain date.
After you have made all of your choices, click the OK button.
Once you have returned to the Calendar, you will see the recurrence details. Click Save and Close and you have now successfully setup a Recurring Appointment.
To setup a Recurring Appointment (one that happens every month, for example), follow these steps:
Open your Calendar.
Double Click the date of the next appointment (or choose File New Appointment).
Type in the Subject, Location, Date, and Time, as usual.
Click on "Recurrence" on the Toolbar.
Once the Recurrence Windows opens, choose all options that apply to your recurring appointment (for example: Monthly, Every 28th Day, etc).
You have the option of setting up the recurrence for a certain time period. You may have the recurrence appear 10 times on your Calendar, for example OR you may choose to have it End after a certain date.
After you have made all of your choices, click the OK button.
Once you have returned to the Calendar, you will see the recurrence details. Click Save and Close and you have now successfully setup a Recurring Appointment.
Subscribe to:
Posts (Atom)

Most Popular
-
Have you ever printed a document only to remember that you forgot to print that one last line? Save a tree and save some ink with this tip. ...
-
 Intrenational users sometimes view things differently than here in the US. But, did you know you can change Excel to International View? ...
-
Many people are familiar with online e-mail accounts that provide access from anywhere you have Internet access. These accounts include G...

