Showing posts with label outlook calendar help. Show all posts

Outlook Calendar Tip

I've shown many different ways of changing the appearance of Outlook; but this one is easy and used by many people I've trained over the years - I just had to share it with everyone.

When using the Calendar in Outlook, the default time periods are 30 minute intervals.  But, what if you have appointments or other scheduled items that need to be broken down into 15 minute intervals?

Follow this tip to learn how.

With the Calendar open, simply right-click in any blank area.

Select the "Other Settings" menu item.

Outlook Calendar Time Settings

Click on the "Time Scale" drop down arrow and select the time interval you want to appear.

Notice the interval options are from 1 to 60 minutes.  Personalize Outlook's Calendar to fit your needs.

Click on the "OK" button to save the changes.

It's that simple.

NOTE:
  The only views that show the new time intervals are the "Day" and "Work Week."  Or any other personalized views that show the default intervals.

Outlook Calendar Tip

Here's another way of moving around the Calendar that may be quicker for some users.

If you have a view open that shows the mini calendars, you can open a pop-up window that will allow you to move multiple months.


Simply click on the Month/Year Header and you will receive a pop-up window with the three (3) months prior and three (3) months after.  Scroll to select the Month you wish.

NOTE:  DO NOT release your mouse click, as the pop-up will disappear.

Play with it, you may find it's a faster way of moving around within Outlook.

Outlook Calendar Count Down

Outlook doesn't support creating calendar items that countdown (or count up) to a specific date. You'll need to create each item individually. The easiest way to do this is outside of Outlook, using a program like Excel, and import the file to the Calendar. You can use this method with any version of Excel and Outlook, although some steps might be slightly different in older versions of either program.

If you have another spreadsheet program, such as Works, you may need to save it as a CSV or text file to import into Outlook.

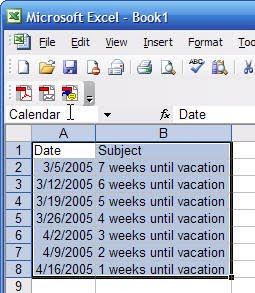
Create your series in a spreadsheet program - Excel makes it very easy because it allows you to drag and fill cells in a series, changing the numbers in each row. At the very least you need two columns, Date and Subject. (Outlook uses "Start Date" as the name of the date field.)

Tip: A Categories field will make it easier to delete the items if you make a mistake when importing. If you want to use other fields, create one sample record in an new calendar folder and export it to Excel so you know what fields you need. This will eliminate the need to map fields during the import process.

To begin with "today" in Excel, press Ctrl+; (semi-colon) in the first data row of the date column.

Select the cell and drag down to fill the column with consecutive dates, stopping at the date you are counting down to. Common Excel tricks such as entering two non-consecutive dates in a column and dragging allows you to create a pattern, such as weekly or every other day. (You can use this with birthdays too.) If the fill doesn't use a series, click on the Smart tag and choose series.

Go to the last date and enter your subject line. Use a number as the first or last character and Excel will complete the series when you drag. Either type the subject line twice or drag it up one cell and change the 0 to 2, as in the screenshot.

Select both cells in the subject column and drag up. Excel will complete the series.

Select the entire used range and type a name for it in the named range field above column A.

Save and close the workbook.

Now it's time to import it into Outlook.

Select File Import and Export

Select Import from another program or file.

Select the program or file type. In this example, we're using Excel to create the file, so we choose Microsoft Excel.
Browse for the file. (Make sure the file is Closed in Excel or you will receive an error.)

Select the Calendar folder you want to Import the file into.

Click to check the box beside Import [named range] to [folder] and if fields need mapped the Map Custom fields dialog opens.

Outlook doesn't recognize Date, so you will need to drag it to "Start Date" and Outlook will add it to the Mapped From column next to Start Date.


Click Finish to import your items.

Outlook Recurring Appointments

Did you know that you can setup recurring appointments in Outlook? I have seen many people forget meetings, appointments, etc - and these are the ones that happen on a regular basis. Our lives are too busy these days, so we need to learn to take advantage of the power of Outlook.

To setup a Recurring Appointment (one that happens every month, for example), follow these steps:

Open your Calendar.

Double Click the date of the next appointment (or choose File New Appointment).

Type in the Subject, Location, Date, and Time, as usual.

Click on "Recurrence" on the Toolbar.

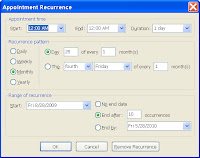
Once the Recurrence Windows opens, choose all options that apply to your recurring appointment (for example: Monthly, Every 28th Day, etc).


You have the option of setting up the recurrence for a certain time period. You may have the recurrence appear 10 times on your Calendar, for example OR you may choose to have it End after a certain date.

After you have made all of your choices, click the OK button.

Once you have returned to the Calendar, you will see the recurrence details. Click Save and Close and you have now successfully setup a Recurring Appointment.

Most Popular