With 2014 just around the corner, I know most people could make 2014 much better by learning some simple Keyboard Shortcuts.
I've given tips for keyboard shortcuts before, but here are some easy to use keyboard functions which help make tasks that much quicker.
We've all heard of CTRL + X to Cut, CTRL + C to Copy, CTRL + V to Paste, but do you know about CTRL + Z and CTRL + Y?
CTRL + Z will Undo the previous action and CTRL + Y will Redo the previous Undo.
When browsing an Internet page, not only can you use the Page Down to move down a page, but sometimes it might be easier to just press the Space Bar. That's right, you can move down an Internet page by simply pressing the Space Bar.
And, here's an old-school keyboard shortcut that came in handy when a friend's mouse died. To open up the File Menu, press ALT + F.
To review:
CTRL + Y will Redo an Undo
Space Bar will move a page down on an Internet page
ALT + F will open the File Menu
I hope these keyboard shortcuts will help you in 2014 and hope that everyone has a Happy New Year!
Showing posts with label word tips. Show all posts
Showing posts with label word tips. Show all posts
Word 2007 Spacing Tip
Joe, of Aeroflex asks, "I have a Word 2007 document and I want to see the spacing above the first line at the top of each page. Some of the pages show the space and some do not."
Thanks for your question Joe!
Yes, Word 2007 is a bit different than previous versions of Word and the best way to add spacing above the first line at the top of each page is to use Styles.
The styles are located on the "Home" tab. Preset styles, such as Headers, will add spacing above the line. If you do not like any of the preset styles, simply click on the drop down arrow (the very bottom on the scroll bar - it says "More" when you hover the mouse over it) and select "Apply Styles."
In the window that appears, you may select a style to base your new style on and then select the "Modify" button.
This takes you to the old window for Style Formatting. Change any formatting you would like by clicking on the "Format" button at the bottom of the window.
Click "OK" until you return to the document and the new style will be added to the Style Gallery.
There is the possibility of using paragraph formatting as well. I'll cover this in next week's email.
I hope this helps!
If you have a question, simply click here to send me your questions. I'll post as many answers as I can in the following Tips e-mail.
Word 2007 Tip
Do you use the Highlighter in Word? Highlighting in Word can be helpful for pointing out certain words and phrases; but it doesn't print very well.
There is a somewhat simple way to hide the Highlighter for printing.
Click on the "Office" button and select the "Word Options" button.
Click on "Display" on the left menu.
Clear the "Show Highlighters" checkbox.

Click on the "OK" button to save the changes and return to your document.
The Highlighters are now hidden. Print as needed.
Remember to repeat the steps above to unhide the Highlighters. This time select the "Show Highlighters" checkbox.
There is a somewhat simple way to hide the Highlighter for printing.
Click on the "Office" button and select the "Word Options" button.
Click on "Display" on the left menu.
Clear the "Show Highlighters" checkbox.
Click on the "OK" button to save the changes and return to your document.
The Highlighters are now hidden. Print as needed.
Remember to repeat the steps above to unhide the Highlighters. This time select the "Show Highlighters" checkbox.
Word Numbering Tip
How many times have you had a numbered list in Word and then decided you needed a paragraph of text in the middle of the numbered list? Did the numbering start over at "1?"
Depending on when you numbered the list and when you entered the paragraph, the list may start over at the number "1."
If this happens, simply right-click on the numbered item after the inserted paragraph. The shortcut menu appears.
Select "Continue Numbering" from the menu.
The numbered list will continue from the last number prior to the inserted paragraph.
Green Word Tip
Have you ever printed a document only to remember that you forgot to print that one last line? Save a tree and save some ink with this tip.
Instead of reprinting the entire page, print only the last line.
First, open the document and insert text of the last line.
Next, highlight the rest of the text on the page and change the format to "White" text.
Insert the printed page (the one with the missing line) into the printer.
Finally, select "File" and then "Print." On the "Print Dialog" window, type in the page number and click on the "OK" button to print.
HINT: Word 2007, click on the "Office" button, hover to "Print" and select the "Print" option. Follow the steps above once the "Print Dialog" window opens.
Since white text does not print, the only thing that will print is the last line. Now, the entire page is printed correctly and you've saved some paper and ink.
Word Tables Tip: Delete the Blank Page After Table
John wrote, "Why does a blank page print after my table?"
This is caused as Word inserts a "Return" after every table created. There are a few ways of handling this.
First, select only the pages you want to print. For example, if the table is on Page 14 of your document, print only pages 1 through 14. This will stop Page 15 (the blank page) from printing. Do this by selecting "File Print" and in the "Print" dialog window, type 1-14 in the "Pages" field.
You could change the margins, but often when this happens is when you've created a table specifically formatted for specialty paper such as labels.
Another easy way is to change the size of the font for the Paragraph marker (or "Return").
First, if you cannot see the Return, turn on your "Show/Hide" by clicking on the "Paragraph" button on the standard toolbar.

Highlight the "Return" and change the font to something very small, such as "4 point," by clicking on the font size on the formatting toolbar and changing the number to "4."

This is caused as Word inserts a "Return" after every table created. There are a few ways of handling this.
First, select only the pages you want to print. For example, if the table is on Page 14 of your document, print only pages 1 through 14. This will stop Page 15 (the blank page) from printing. Do this by selecting "File Print" and in the "Print" dialog window, type 1-14 in the "Pages" field.
You could change the margins, but often when this happens is when you've created a table specifically formatted for specialty paper such as labels.
Another easy way is to change the size of the font for the Paragraph marker (or "Return").
First, if you cannot see the Return, turn on your "Show/Hide" by clicking on the "Paragraph" button on the standard toolbar.
Highlight the "Return" and change the font to something very small, such as "4 point," by clicking on the font size on the formatting toolbar and changing the number to "4."
Print Word Documents in Reverse Order
Have you ever had the need to print in reverse order? Microsoft Word allows you to print in reverse order, when needed.
Word 2003 (and earlier versions)
1) Click on Tools | Options
2) Click on the "Print" Tab
3) Click the checkbox for "Reverse Print Order"
4) Click OK to exit and save the settings

Now when you choose to print a document, it will be printed in reverse order. (i.e. If you have a 20 page document, page 20 will print, then 19, etc.)
Word 2007
1) Click the Office icon in the upper left corner
2) Click on the "Word Options" button in the lower part of the screen
3) In the Word Options screen, click on the "Advanced" Tab
4) Scroll down to the Print area and click on the checkbox "Print pages in reverse order"
5) Click OK to exit and save your changes

With any version, when you are ready to print documents in normal order (i.e. 1 through 20, printing page 1 first), you will need to "uncheck" the box.
It's that simple!
How to Create Screen Tips in Word
When sending Word documents electronically, there may be some advantage to providing Screen Tips. Screen Tips are when you "hover" over a word or phrase and a Tip pops up.
These are very simple to setup, just follow these steps:
1) Select the word or phrase you wish to add the Tip
2) Right-click and choose Hyperlink
3) Click "Screen Tip"
4) In the pop-up window, simply type the text (tip) you wish to appear
5) Click "OK"
6) Type a Name for the Tip in the "Address" box and click "OK"
To test the Screen Tip, simply hover your mouse and you should see the Tip.
More Word Shortcut Keys
If you enjoy shortcuts (who wouldn't?), here are some more Shortcut Keys that will help you become faster in Word.
Ctrl + K = Insert hyperlink
Ctrl + Z = Undo
Ctrl + Y = Redo
Ctrl + L = Aligns the line or selected text to the left
Ctrl + E = Aligns the line or selected text to the center
Ctrl + R = Aligns the line or selected text to the right
Ctrl + M = Indent the paragraph
Practice these handy tips and you may forget about your mouse :)
Create Your Own Shortcuts
If you're not an expert, it can take many clicks and a lot of menu navigations to perform basic tasks. With shortcut keys, you can speed up your working pace without lifting your hands from the keyboard.
In Word, you can create your own keyboard shortcuts! For example, if you are using the "Word Count" feature often, you can assign any key combination like Alt+W to run the Word Count command.
Follow these simple steps to create your own shortcuts keys for your favorite command:
Go to the Tools menu and click on Customize. (Hint: In Word 2007, the Customize Option is located on the "Office" button)
In the dialog box that opens, click on the "Keyboard..." button.
A list of all the categories of commands will appear on the left side of a new dialog box.
Click on the Category that contains the command which you want to assign a shortcut key.
From the right side, choose the Command you want to assign a keyboard shortcut and then Type or
Click the key combination you want to use to create the shortcut.
Now click on the Assign button and then click Close.
Now, when you are ready to perform the command, simply use your Shortcut Keys that you just setup.
Change Sentence Case in Word
What's the quickest way to change an entire sentence to UPPERCASE, lowercase, or Block Letters?
Here's how you do it.
Select the sentence you want to change.
Hold down the Shift key.
Press F3.
Each time you press F3 it will change the UPPER, lower or Block Case, like this.
Shift + F3, Everything is CAPITAL
"SELECT THE SENTENCE YOU WANT TO CHANGE"
Shift + F3, all letters are in Block.
"Select The Sentence You Want To Change"
Shift + F3, all letters are in lowercase.
"select the sentence you want to change"
Word Background Blues
If the white background hurts your eyes or is distracting to you, Word allows you to change the appearance of the screen so that you have a blue background with white text.
Many people find the blue background more pleasant and easier on the eyes. You can change this appearance of Word by following these steps if you are using a version of Word prior to Word 2007:
Click on the Tools menu and choose Options. Word displays the Options dialog box.
Select the General Tab.
Click the check box "Blue Background, White Text".
Click on OK.
Hopefully this tip can save a few strained eyes :)
How to Add Watermarks
Have you ever wanted to add a Watermark to a Word document and didn't know how? It's really quite simple.
With your document open, simply click on View Header & Footer.
From there, your document text will appear to be "shaded" - this helps you to see the Header or Footer information with which you are working.
Simply click Insert Picture and then choose to insert a File on your Computer or to choose a Graphic from Clipart. Once you find your Graphic, double-click to insert it into your Header & Footer area.
Next, Right-Click the Graphic and choose "Format Picture" from the sub-menu.
If you are not already, be sure and click on the "Picture" Tab. In the middle of this screen, you will see Image Control / Color. Click on the Drop-Down and choose "Washout".
Click OK to return to your document.
Notice that the image is now very light in color. Now, simply close your Header & Footer by clicking on the CLOSE button on the Toolbar.
Once back in your document, you will notice that the Image is behind the text of your document and shows up as a Watermark.
A great resource for Images is AZVirtual.com.
Preview Word Documents without Opening
If you are not sure you are opening the correct document, you do not need to open the document fully. Simply follow these steps:
Choose File, Open.
In the Dialog Box, change your View Type to "Preview".
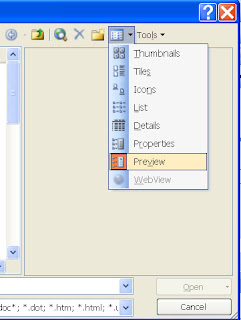
The View Type is the button on your Toolbar that is to the Left of the word "Tools".
This will let you preview the first few paragraphs of the document to ensure you are opening the document you really want.
Choose File, Open.
In the Dialog Box, change your View Type to "Preview".
The View Type is the button on your Toolbar that is to the Left of the word "Tools".
This will let you preview the first few paragraphs of the document to ensure you are opening the document you really want.
Subscribe to:
Posts (Atom)

Most Popular
-
 I often hear people say "I no longer see the Forward, Reply, and Reply to All buttons on my emails. How do I get this information back?...
 -
I've had a few people ask me lately how to filter lists using Excel. It really is as simple as clicking a button on the Ribbon. If you...
-
Are you Left Handed? I mean truly Left-Handed, meaning you write and use the mouse with your Left Hand? If you are and you haven't setup...
