Have you ever printed a document only to remember that you forgot to print that one last line? Save a tree and save some ink with this tip.
Instead of reprinting the entire page, print only the last line.
First, open the document and insert text of the last line.
Next, highlight the rest of the text on the page and change the format to "White" text.
Insert the printed page (the one with the missing line) into the printer.
Finally, select "File" and then "Print." On the "Print Dialog" window, type in the page number and click on the "OK" button to print.
HINT: Word 2007, click on the "Office" button, hover to "Print" and select the "Print" option. Follow the steps above once the "Print Dialog" window opens.
Since white text does not print, the only thing that will print is the last line. Now, the entire page is printed correctly and you've saved some paper and ink.
Word Tables Tip: Delete the Blank Page After Table
John wrote, "Why does a blank page print after my table?"
This is caused as Word inserts a "Return" after every table created. There are a few ways of handling this.
First, select only the pages you want to print. For example, if the table is on Page 14 of your document, print only pages 1 through 14. This will stop Page 15 (the blank page) from printing. Do this by selecting "File Print" and in the "Print" dialog window, type 1-14 in the "Pages" field.
You could change the margins, but often when this happens is when you've created a table specifically formatted for specialty paper such as labels.
Another easy way is to change the size of the font for the Paragraph marker (or "Return").
First, if you cannot see the Return, turn on your "Show/Hide" by clicking on the "Paragraph" button on the standard toolbar.

Highlight the "Return" and change the font to something very small, such as "4 point," by clicking on the font size on the formatting toolbar and changing the number to "4."

This is caused as Word inserts a "Return" after every table created. There are a few ways of handling this.
First, select only the pages you want to print. For example, if the table is on Page 14 of your document, print only pages 1 through 14. This will stop Page 15 (the blank page) from printing. Do this by selecting "File Print" and in the "Print" dialog window, type 1-14 in the "Pages" field.
You could change the margins, but often when this happens is when you've created a table specifically formatted for specialty paper such as labels.
Another easy way is to change the size of the font for the Paragraph marker (or "Return").
First, if you cannot see the Return, turn on your "Show/Hide" by clicking on the "Paragraph" button on the standard toolbar.
Highlight the "Return" and change the font to something very small, such as "4 point," by clicking on the font size on the formatting toolbar and changing the number to "4."
Change Gridline Colors in Excel 2007
This is a happy little feature that was added in Excel 2007. Now you have the ability to change gridline colors in Excel 2007.
To do so, follow these steps:
Click on the "Office" button and click on the "Excel Options" button.
Select the "Advanced" tab from the left menu and scroll to the "Display Options for this Worksheet" area. The gridline color option is located in the second section of "Display Options."

Click on the drop down to select a color. Choose any color you want.
Click on the "OK" button to save the changes and exit the "Excel Options" window.
The gridline colors are now as you selected.
HINT: This may be helpful for situations where you have changed the background color to something light blue; thus, making the gridlines non-viewable.
Here's the caveat: only the selected worksheet is changed. To change each sheet, you must select each sheet name from the drop down by the "Display Options" header and then change its corresponding color.
NOTE: Each new worksheet will display the gridline colors as the default light blue color. You are not changing the default by selecting this option.
It's that simple to change gridline colors in Excel 2007.
7 Easy steps to create an Excel Macro - Slideshow
In this easy to follow slideshow, I show you the 7 easy steps to create an Excel macro.
Macros can be overwhelming, but when you take it step by step it really is simple.
Click here to view the slideshow.
Macros can be overwhelming, but when you take it step by step it really is simple.
Click here to view the slideshow.
Change Excel to International View
Intrenational users sometimes view things differently than here in the US. But, did you know you can change Excel to International View?
Here's how:
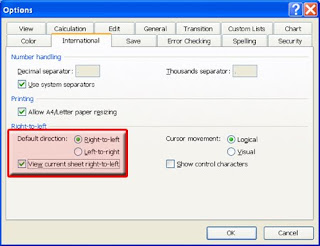
Click on the "Tools" menu and select "Options."
Click on the "International" tab and select the "Right to Left" checkbox. If you want the current spreadsheet to change as well, click on the checkbox for "View current spreadsheet right to left" also.
All future spreadsheets will change to "Right to Left" view with Cell A1 on the right side of the screen as well as the row numbers.

To change it back, simply uncheck the above selections and click on the "Left to Right."
As always, make sure you click on the "OK" button to save the changes and close the "Options" window.
It's that simple!
Here's how:
Click on the "Tools" menu and select "Options."
Click on the "International" tab and select the "Right to Left" checkbox. If you want the current spreadsheet to change as well, click on the checkbox for "View current spreadsheet right to left" also.

All future spreadsheets will change to "Right to Left" view with Cell A1 on the right side of the screen as well as the row numbers.

To change it back, simply uncheck the above selections and click on the "Left to Right."
As always, make sure you click on the "OK" button to save the changes and close the "Options" window.
It's that simple!
Subscribe to:
Posts (Atom)

Most Popular
-
 I often hear people say "I no longer see the Forward, Reply, and Reply to All buttons on my emails. How do I get this information back?...
 -
 This is the text version of a YouTube Live session of Go Ask Debbie: How to Delete Blank Rows in Excel. I thought I'd just do a quick ...
 -
Many people are familiar with online e-mail accounts that provide access from anywhere you have Internet access. These accounts include G...
