Monday, November 11, 2024

Excel Shortcuts Uncovered: Effortlessly Streamline Your Workflow Like a Pro


Excel is a powerful tool that can sometimes feel daunting, especially when you're dealing with complex calculations or large sets of data. The key to making the most of Excel lies in efficiency. Mastering keyboard shortcuts can save you valuable time and help you work like an expert. By learning these shortcuts, you'll navigate your tasks smoothly, leaving frustration behind.

Let’s explore some crucial Excel shortcuts that can really enhance your productivity.


The Power of Keyboard Shortcuts

Keyboard shortcuts can save you a significant amount of time. For example, studies show that users can complete tasks up to 40% faster when they rely on shortcuts instead of using the mouse. With a bit of practice, you can perform many functions in just a few seconds—allowing you to focus on analysis rather than navigation.

Discover the power of Excel shortcuts.

Essential Excel Shortcuts to Get Started

Starting with some basic shortcuts will greatly improve your workflow:

  • Copy (Ctrl + C): Select a cell or range of cells and copy the data quickly.

  • Paste (Ctrl + V): Easily paste data without using the mouse.

  • Cut (Ctrl + X): Remove selected cells and store them on the clipboard for pasting elsewhere.

  • Undo (Ctrl + Z): Correct mistakes by quickly undoing your last action.

  • Redo (Ctrl + Y): Restore an action you just undid.

By familiarizing yourself with these basic shortcuts, you can increase your efficiency in Excel.

Navigating Your Spreadsheet

Once you’re comfortable with the basic shortcuts, you can improve how you navigate through your spreadsheets. Here are some shortcuts to help with that:

  • Arrow Keys: Move one cell up, down, left, or right.

  • Ctrl + Arrow Key: Jump quickly to the end of a data region in any direction.

  • Home: Move to the beginning of the current row.

  • Ctrl + Home: Go to the very beginning of your spreadsheet at cell A1.

  • Ctrl + End: Move to the last cell containing data in the worksheet.

These navigation shortcuts will help you quickly locate important information within large datasets without wasting time.

Efficiently navigating large datasets with shortcuts.

Formatting Made Easy

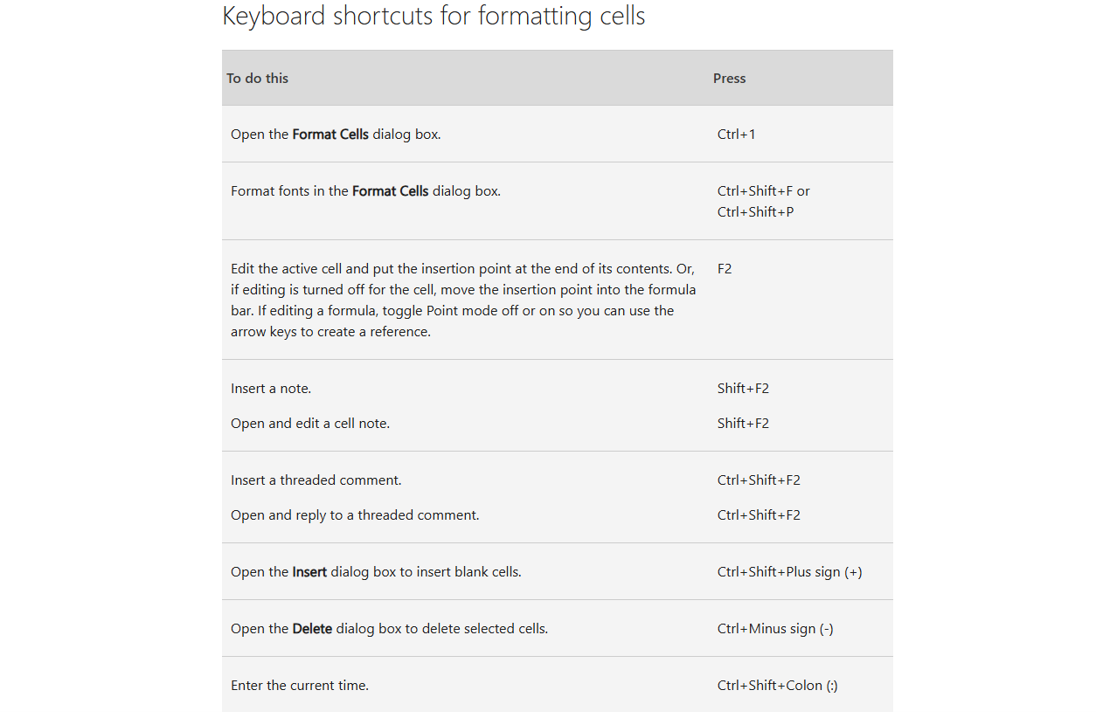
Excel is not only about data management; formatting is also crucial for clarity. Utilize these shortcuts to format cells quickly:

  • Bold (Ctrl + B): Emphasize your text or numbers.

  • Italic (Ctrl + I): Highlight important notes.

  • Underline (Ctrl + U): Make text or figures clearer by underlining.

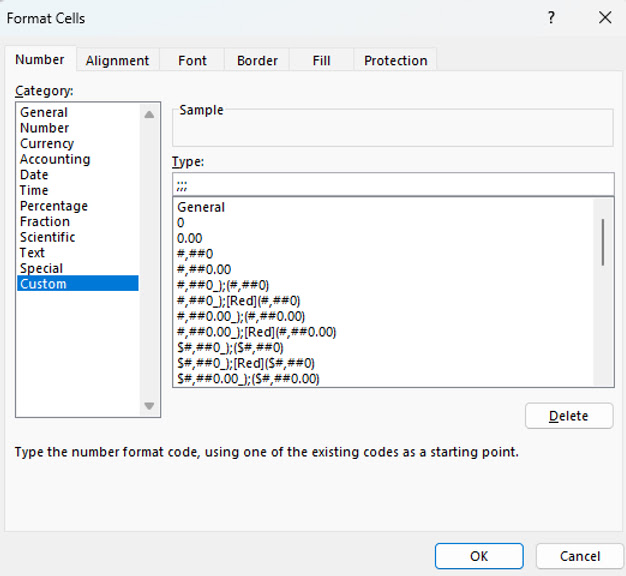
  • Format Cells (Ctrl + 1): Access the Format Cells dialog to change cell properties.

  • Alt + E, S, V: Use this combination for Paste Special, which helps maintain the intended format.

Mastering these formatting shortcuts lets you create well-organized and appealing spreadsheets quickly.

Advanced Excel Shortcuts for Power Users

For those ready to take their skills up a notch, consider these advanced shortcuts:

  • F2: Edit the active cell directly, avoiding the need to double-click.

  • Ctrl + Shift + L: Toggle filters on your data with ease.

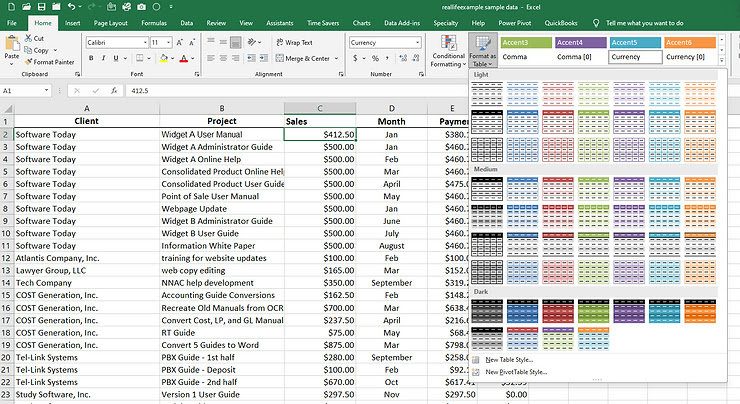
  • Ctrl + T: Convert your dataset into a table for easier management and analysis.

  • Alt + Enter: Start a new line within a cell without moving to the next cell.

  • F4: Repeat the last action, which can save time on repetitive tasks.

Using these advanced shortcuts can help streamline your workflow when managing complex datasets.

Unlock advanced Excel features with shortcuts.

Tips for Remembering Your Shortcuts

Learning new shortcuts can seem challenging, but here are simple strategies to help you remember them:

  1. Practice Regularly: Incorporate shortcuts into your daily routine to help you remember them.

  2. Create a Cheat Sheet: Jot down the most critical shortcuts and keep them near your workspace.

  3. Set Learning Goals: Aim to learn a few new shortcuts each week.

  4. Use Mnemonics: Develop phrases or associations that make remembering shortcuts easier.

  5. Stay Consistent: Consistently apply shortcuts to frequently performed tasks.

By following these tips, you will learn and remember shortcuts more effectively.


Unlocking the Full Potential of Excel

Improving your workflow with Excel shortcuts is more than just about speed; it is about working smart. By incorporating these keyboard combinations into your routine, you can shift your focus to analysis rather than mechanical tasks. Once you commit to learning essential shortcuts and practice them regularly, you'll notice a significant boost in your efficiency.

Try out these shortcuts to transform your spreadsheet experience. Soon, you'll navigate and manipulate data with ease—just like a pro. Happy Excel-ing!


Thursday, October 24, 2024

Mastering Excel Formulas for Optimal Business Productivity


Unleashing the Power of Excel

In today's fast-paced business landscape, maximizing productivity is essential for success. One tool that stands out in this quest is Microsoft Excel. This powerful software not only helps you manage data and perform calculations but also streamlines workflows through the use of formulas. Learning to master Excel formulas can lead to significant enhancements in your operational efficiency, whether you manage a small business or work in a large corporation.

Excel formulas can automate repetitive tasks, cut down on human error, and enable deeper data analysis. In this post, we'll explore how to harness these formulas to boost your business productivity.

Understanding Excel Formulas

Excel formulas are equations that conduct calculations on the values in your worksheets. They may seem intimidating at first, but by breaking them down into simpler components, you can make them more manageable. A typical Excel formula begins with an equal sign (`=`), followed by the function name, parentheses, and the required arguments.

For example, using the formula =SUM(A1:A10), you can quickly calculate the total of the values found in cells A1 through A10. By becoming familiar with various functions and their syntax, you can unlock the full potential of Excel for your business.

Commonly Used Excel Formulas for Business

Excel provides a wide array of formulas tailored to meet diverse business needs. Here are some of the most commonly used formulas, along with their applications:

1. SUM and AVERAGE

The `SUM` formula adds together a range of cells, while `AVERAGE` computes the mean. These formulas are vital for financial analysis, like calculating total monthly expenses or average sales over a quarter.

=SUM(B2:B10) // Total expenses from the B column


=AVERAGE(C2:C10) // Average sales from the C column


For instance, if your total sales for January and February are $10,000 and $12,000 respectively, using these formulas will help you quickly assess combined totals and averages over time.

2. IF Statements

The `IF` function allows you to set conditions while analyzing your data. This can be used to create performance metrics or generate reports.

=IF(D2 >= 1000, "Target Met", "Target Not Met")


For example, if a sales representative reaches a sales target of $1,000, they will receive a "Target Met" status—ideal for motivating teams and tracking performance.

3. VLOOKUP and HLOOKUP

`VLOOKUP` and `HLOOKUP` enable you to search for data across large datasets. `VLOOKUP` finds a value in the first column and returns a corresponding value from another specified column, while `HLOOKUP` works similarly for rows.

=VLOOKUP(E2, A1:B100, 2, FALSE)


For instance, if you need to locate product prices in an inventory list, these functions can save hours compared to manual searches.

4. CONCATENATE

The `CONCATENATE` function (or using the `&` operator) allows you to merge data from different cells into one. This can be handy for compiling reports or preparing email distribution lists.

=CONCATENATE(A2, " ", B2) // Merges first and last names


If your contact list has first names in column A and last names in column B, you can easily generate full names for effective communication.


5. COUNTIF and SUMIF

These functions allow you to analyze data based on specific criteria. `COUNTIF` counts the cells that meet a condition, while `SUMIF` adds the cells that meet a defined criterion.

=COUNTIF(B2:B370, ">1000") // Counts entries over 1000


=SUMIF(C2:C37, "Mar", B2:B37) // Sums sales-related values


By implementing these functions, you can track sales performances efficiently. For instance, if you find that 70% of your product sales come from just 30% of your inventory, you can focus your efforts accordingly.

Tips for Maximizing Excel Formulas

Mastering Excel formulas goes beyond simply knowing how they function. Here are some actionable tips to improve your efficiency:

1. Use Named Ranges

Instead of referencing cells directly, consider naming your ranges. This approach makes your formulas easier to read and manage.

=SUM(Sales) // Instead of using cell references


Using named ranges can simplify the process of tracking changes over time.

2. Organize Your Data

Organizing your data well can greatly enhance the effectiveness of your formulas. Use structured tables, which make it easier to apply formulas. For example, formatting your data as a table can automatically adjust row and column references, streamlining calculations and data management.


3. Regularly Review and Optimize

Regular audits of your formulas and processes can help identify inefficiencies. For example, by reviewing formulas every quarter, you can eliminate redundancies and ensure ongoing accuracy, enhancing data clarity and reliability.

4. Explore New Functions

With each new version of Excel, exciting functions are introduced. For example, the `XLOOKUP` function streamlines your data lookup processes, offering a more versatile alternative to older lookup functions.

Final Thoughts

The potential of Excel formulas is vast. By effectively integrating them into your daily business processes, organizations can significantly enhance productivity and data accuracy. Mastering these formulas not only saves time but also strengthens decision-making processes, contributing to business growth.

By investing your time in learning these essential Excel skills, you can reap substantial benefits in efficiency. As technology evolves, staying informed and adaptive is critical. Focus on mastering Excel formulas, and you will be well-equipped to navigate the complexities of modern business operations.

In conclusion, effectively leveraging Excel can be transformative for your business productivity!

Learn more Excel Tips & Tricks:

Sunday, October 13, 2024

3 Ways to Hide Data in Excel 


Hey everyone! Today I’m going to show you 3 ways to hide data in Excel, step by step. Whether you’re working on a confidential project or just want to keep certain parts of your sheet clean and organized, this guide is for you.


So, let’s dive in!

Watch here or continue reading below.


# 1: Hide Rows or Columns


The first and simplest method to hide data in Excel is by hiding entire rows or columns. Let’s start with this.


1. Select the rows or columns you want to hide by clicking on the row numbers or column letters.


2. Once selected, right-click and choose "Hide" from the dropdown menu.


And that’s it! Those rows or columns are now hidden, and they won’t be visible on your screen or when you print the document. But don’t worry, they’re still there—just hidden. If you need to show them again, simply select the rows or columns around them, right-click, and choose “Unhide.”


# 2: Hide Data in Cells Using Custom Formatting


The next method is a little more subtle—hiding data in cells using custom formatting. This is useful when you want the data to be hidden but still exist in the cells, which can be important for formulas and calculations.

1. Select the cells containing the data you want to hide.


2. Right-click and choose “Format Cells.”  


3. In the Format Cells window, go to the “Number” tab, then select “Custom” from the category list on the left.


4. In the “Type” box, enter three semicolons `;;;` and hit OK.

Now, the data is still there but invisible on the sheet! The cells will appear blank, but if you click on them, you’ll see the values in the formula bar. This is a great way to hide data without deleting or losing it.


# 3: Use the Grouping Feature to Hide Data


Another option is using the grouping feature, which allows you to collapse and expand specific sections of your worksheet. This is handy when you want to hide large sections of data but also want the flexibility to bring them back quickly.


1. Select the rows or columns you want to group.


2. Go to the “Data” tab at the top of the screen.


3. Click on “Group” in the Outline section. A minus sign (-) will appear next to the grouped rows or columns.


 4. Click the Minus sign to collapse and hide the selected data.


To show the hidden data again, just click the Plus sign (+) that appears. This is a great feature for managing large data sets in an organized and efficient way!


And that’s it, folks! Now you know 3 different ways to hide data in Excel.


Leave a comment below if you have any questions or if there’s another Excel trick you want to learn.

Wednesday, October 9, 2024

10 Tips You Didn’t Know You Could Do in Microsoft Outlook


Today, we’re diving into Microsoft Outlook and uncovering 10 awesome tips you probably didn’t know you could do. These tricks will help you streamline your workflow, stay organized, and boost your productivity. Let’s get started!

View on YouTube or Read below.


## 1. Schedule Emails to Send Later


Writing an email now but don’t want to interrupt someone’s day? Schedule it to send at the perfect time, ensuring your message lands when it’s most likely to be seen!


How to do it:

- Compose your email, then go to the “Options” tab.

- Click on “Delay Delivery.”

- Set your preferred date and time, and hit send!


## 2. Use Quick Steps for Routine Tasks


Automate repetitive actions to save time! Quick Steps allow you to execute multiple tasks with a single click, so you can focus on more important work.


How to set it up:

- Go to the “Home” tab and find the “Quick Steps” box.

- Click “Create New” and select your actions.


## 3. Clean Up Your Inbox with Clean Up Tool


Keep your inbox tidy! The Clean Up Tool helps you remove unnecessary emails from threads, making it easier to find important messages and reducing clutter.


Here’s how:

- Select the email conversation you want to clean.

- Click “Clean Up” in the Home tab.

- Choose “Clean Up Conversation.”


## 4. Create Rules for Automatic Email Management


Say goodbye to manual sorting! Create rules to automatically organize incoming emails, so you can spend less time managing your inbox and more time being productive.


To set it up:

- Go to “File” > “Manage Rules & Alerts.”

- Click “New Rule” and follow the prompts.

(Or, you may Right-click and select Rules, then Manage Rules & Alerts)


## 5. Use Categories for Better Organization


Easily prioritize your emails and tasks visually! Categorizing helps you quickly identify what needs your attention, keeping you focused and organized.


How to categorize:

- Right-click on an email, select “Categorize,” and choose a color or create a new category.


## 6. Keyboard Shortcuts for Faster Navigation


Navigate Outlook like a pro! Using keyboard shortcuts can drastically speed up your workflow, allowing you to accomplish tasks quicker without relying on your mouse.


Here are a few must-know ones:

- Ctrl + R: Reply to an email.

- Ctrl + N: Create a new email.

- Ctrl + Shift + M: Create a new message from anywhere in Outlook.


## 7.  Schedule Meetings Directly from Email


By turning an email thread into a meeting request with just a click, you save time and avoid the hassle of switching between different tools. This ensures clear communication, eliminates confusion about dates and times, and streamlines coordination with your team—all from the comfort of your inbox. You get to stay organized and efficient, focusing on what matters most without wasting time on back-and-forth scheduling.


When reading an email, click on the Meeting button (under the Home tab) to quickly turn an email thread into a meeting request.


## 8. Pin Important Emails


Keep essential messages front and center! Pinning important emails ensures that you always have quick access to critical information, making follow-ups easier.


How to do it:

- Right-click on the email and select “Pin.” It’ll stay at the top until you unpin it!


## 9. Set Reminders for Follow-Up


Never forget a follow-up! Setting reminders on emails ensures you stay on top of your commitments, helping you manage your time and responsibilities better.


Here’s how:

- Right-click on the email, select “Follow Up,” then choose a reminder date.


## 10. **Use Quick Parts to Insert Frequently Used Text*

With Quick Parts, you can quickly insert commonly used text, like responses, disclaimers, or greetings, into emai


ls without retyping or copying and pasting. This saves you time and effort, ensures consistency in your communication, and reduces the risk of mistakes. By streamlining repetitive tasks, you can focus on more important work and respond to emails faster, making your workflow more efficient and stress-free.

Save common text snippets with Quick Parts:

  • Highlight the text in an email, go to the Insert tab, and select Quick Parts to save it for future use.


And there you have it—**10 fantastic tips for mastering Microsoft Outlook**! These features will not only save you time but also enhance your overall productivity. If you found these tips helpful, don’t forget to like, subscribe, and share your favorite Outlook hacks in the comments below!


See you next time, and happy emailing!

Thanks for your Support!

https://amzn.to/3Y0kRWP


Note: This post contains affiliate links, which means at no additional cost to you, we will receive a small commission if you make a purchase using the links. This helps support the channel and allows us to continue to make videos like this. Thank you for your support!