I hear this question a lot - In Excel, when I type in a number that has Zeros at the beginning (like a Zip Code), the Zeros disappear - how can I get them back?
First, you need to realize that Excel sets a format for every cell. The default format depends on the information you type, as Excel tries to read your mind. Computers are not always good mind readers.
For example: When you type text in a cell, Excel sets the format of that cell to "text". When you type a number, it sets the format of that cell to a number. So, when you type in a Zip Code of "00123", Excel tells you that there are no Zeros needed and places the number "123" in the cell.
A quick fix for this is to Right-Click the cell and choose "Format Cells." In the Format Dialog Box, choose "Custom" and in the "Type" field, type the number of digits for your numbering. So, in the Example above, you would type "00000" as Zip Codes contain five digits.
Once you click "OK", your Disappearing Zeros will Reappear!
If you have a group of cells that do not contain a specific number of digits, then you will need to use a macro. Look for future advanced training on Macros for that fix.
Online Weight Loss Tracking
Today's resolutions for weight loss can be made a lot easier with online weight loss tracking sites. These sites provide an easy way to enter information such as food you've eaten and they often have caloric information for typical foods, including popular restaurants.
Check out some of these sites and hopefully one of them will fit your needs to meet your goals for 2010!
Spark People
Fit Day
My Health & Fitness
Med Help
Check out some of these sites and hopefully one of them will fit your needs to meet your goals for 2010!
Spark People
Fit Day
My Health & Fitness
Med Help
Go Ask Debbie - January Newsletter
Here's the link to the latest Go Ask Debbie Newsletter. With Go Ask Debbie, you'll find training and tips on many popular computer software programs, such as Microsoft Word, Excel, Outlook, PowerPoint, Intuit QuickBooks, and more!
http://campaigns.ratepoint.com/campaigns/cfd595848f61a7b6f4e04842074b8c36
http://campaigns.ratepoint.com/campaigns/cfd595848f61a7b6f4e04842074b8c36
Organize Your Digital Photos
There are many ways to organize digital photos, but it can be overwhelming. Here are a few ways to make it a bit easier.
1. Windows makes it easy - you can select a group of photos, right-click and choose to rename them. Choose a name, such as "Christmas 2009 Photos" and Windows will rename all of them with that name and a sequential number. Not my best choice - if you're like us, you take a few different sets of pictures before you download them from your camera. But, it is a free and simple option.
2. Windows Live, by Microsoft, has a FREE downloadable program called Windows Live Photo Gallery. It allows you to tag photos and find them quickly.
3. Siren - also does bulk renaming, while allowing you to search by lots of different information that is collected from the file. It's Freeware, downloadable software.
4. Adobe Photoshop Elements 8 - one of my favorites. It's a much cheaper version of Adobe Photoshop, but it still has many features of the full version. The newest version is very user friendly and adds an organizational element that makes it very easy to create a photo album that is searchable by a lot of different information collected from the file.
Try any of these (Adobe has a Free Trial) and see which one works best for you.
1. Windows makes it easy - you can select a group of photos, right-click and choose to rename them. Choose a name, such as "Christmas 2009 Photos" and Windows will rename all of them with that name and a sequential number. Not my best choice - if you're like us, you take a few different sets of pictures before you download them from your camera. But, it is a free and simple option.
2. Windows Live, by Microsoft, has a FREE downloadable program called Windows Live Photo Gallery. It allows you to tag photos and find them quickly.
3. Siren - also does bulk renaming, while allowing you to search by lots of different information that is collected from the file. It's Freeware, downloadable software.
4. Adobe Photoshop Elements 8
Try any of these (Adobe has a Free Trial) and see which one works best for you.
Mouse-less Right-Click
People are always asking me how I am so fast on the computer. My answer is that I try to keep my hands on the keyboard and avoid the mouse as much as I can. Really? Yes, really!
There are many shortcuts I have provided in my Tips and Newsletters and I will continue to do so. One easy one that many people do not know is that you can use your Keyboard to do a Mouse Right-Click. You've been told for years to Right-click whenever possible to receive shortcut menus. Well, you do not need your mouse to perform a Right-click.
Find the button below on your keyboard. It is usually located next to the CTRL button.
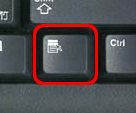
Simply press the ALT key and this button and the right-click (or shortcut) menu will appear.
Use your arrow keys to navigate the menu and press ENTER to select an item.
HINT: Shift + F10 also works to perform the mouse right-click.
There are many shortcuts I have provided in my Tips and Newsletters and I will continue to do so. One easy one that many people do not know is that you can use your Keyboard to do a Mouse Right-Click. You've been told for years to Right-click whenever possible to receive shortcut menus. Well, you do not need your mouse to perform a Right-click.
Find the button below on your keyboard. It is usually located next to the CTRL button.
Simply press the ALT key and this button and the right-click (or shortcut) menu will appear.
Use your arrow keys to navigate the menu and press ENTER to select an item.
HINT: Shift + F10 also works to perform the mouse right-click.
Create Excel Forms
There are a few ways to create forms within Excel. Here, I will show you (in my opinion) the easiest.
An easy example to use is a Timesheet or Expense form.
First, type in the information as you would like it captured. You may type in the line descriptions or categories for the Expenses and place colored cells for the areas in which you want users to type in their actual expense amount. Once the form is created, you will "unlock" the cells (the colored cells in my example) that you wish the user to input data.
To do this, click on Format Cells and click on the "Protection" tab. On this tab you will notice that the cells are "locked" by default. Simply uncheck the box and click OK.
Next, click on Tools Protection and choose "Protect Sheet" (or "Protect Workbook" if you are working with more than one Sheet). This will open a separate window asking you what you would like to protect. In the "Allow all users of this worksheet to" area, make sure the only item checked is "Select unlocked cells".
NOTE: When you are Protecting a Sheet or Workbook, Excel will ask you for a password. Make sure you choose a password if you do not want users to edit the form. Excel does NOT require you to use a password.
Finally, click File Save As and choose "Excel Template" from the "Save as Type" drop down. This will save your file in the default folder. If you are working on a network, be sure and get with your administrator for the exact location to save this file.
Now that you have saved your form, users will simply click File New and choose "on my computer" for the location of the template. Once the users double-click to open the template, they will only be able to type information in the unlocked cells.
Go Ask Debbie - December 2009 Newsletter
Here is the link to the December Newsletter for Go Ask Debbie. I hope you enjoy and are able to use some of the helpful tips!
http://goaskdebbie.com/Archives/GADNewsletterDec2009.pdf
http://goaskdebbie.com/Archives/GADNewsletterDec2009.pdf
Subscribe to:
Posts (Atom)

Most Popular
-
 I often hear people say "I no longer see the Forward, Reply, and Reply to All buttons on my emails. How do I get this information back?...
 -
 This is the text version of a YouTube Live session of Go Ask Debbie: How to Delete Blank Rows in Excel. I thought I'd just do a quick ...
 -
Are you Left Handed? I mean truly Left-Handed, meaning you write and use the mouse with your Left Hand? If you are and you haven't setup...